
LAPTOP CHIPLEVEL.CHIPLEVEL MOTHERBOARD,,LED/LCD TV .LED/LCD MONITOR.REPAIR.MEMORY.GRAPHICS.PRINTER.LAPTOP.HARD DISK.REPAIRING TIPS.CIRCUIT EXPLANATION.SERVICE TIPS.WORKING PRINCIPLES.TUTORIALS.SCHEMATIC,BIOS Contact 9633034123
Saturday, August 31, 2019
Friday, August 30, 2019
How to Check If Your Windows 10 License Type Is Retail, OEM, Or Volume & Activation Status.
What’s retail Windows 10 license?
You get the retail license when you purchase Windows 10 copy from a retail store or an online store. The retail license usually comes in a boxed copy and is not specific to any PC and can be transferred from one PC to another. That is, you can remove Windows 10 from one PC and install and activate it on another computer.
What is OEM Windows 10 license?
OEM (original equipment manufacturer) license is used by PC manufacturers to offer Windows 10 preinstalled on their computers. In other words, you get the Windows 10 OEM license when you purchase a new PC pre-installed with Windows 10. For instance, if you buy a new Dell computer pre-installed with Windows 10, then the license type is OEM.
If your PC came preinstalled with a genuine Windows 10 license, then it likely has OEM license. Unlike the retail license, OEM license cannot be transferred from one computer to another. These days, OEM product keys are embedded in the BIOS/UEFI firmware to avoid license theft.
What is volume Windows 10 license?
Volume licensing is usually used by governments, educational institutes, and large businesses. Since they buy in bulk, they get Windows license for a much lesser price than home users who buy one or two licenses.
Check if Windows 10 license is retail, OEM, or volume
If Windows 10 is installed on your computer, you might be curious to know the type of Windows 10 license you have on your PC.
Windows 10 offers an easy way to check if your Windows 10 license is retail, OEM, or volume. With the execution of a simple command, you can know the Windows 10 license type.
Step 1: Open the Command Prompt by typing CMD in the Start/taskbar search field and hitting Enter.
Step 2: At the Command Prompt window, type the following command and then press Enter key.
Slmgr –dli
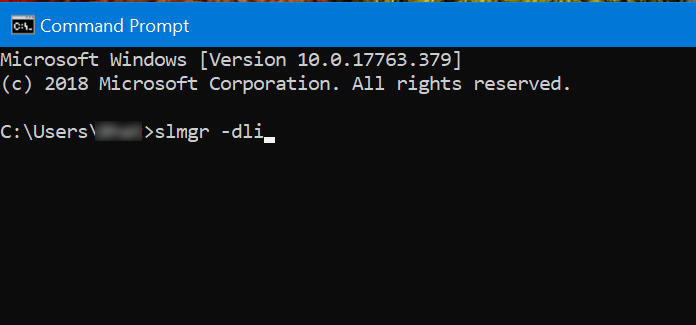
Pressing the Enter key will open the Windows Script Host dialog which includes the Windows 10 license type.
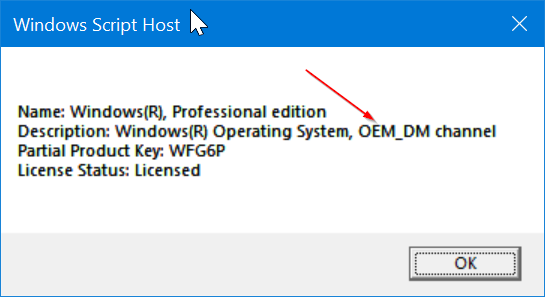
As you can see in the picture above, we are using OEM license on our PC. If you are using a retail license, you will see the RETAIL word instead of OEM. VOLUME word will show up if the license type is volume.
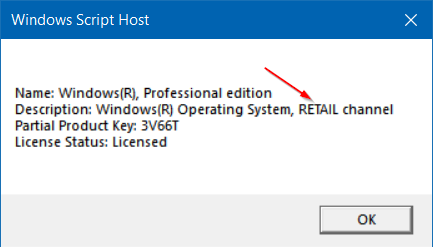
The dialog also displays the partial product key and current activation status.
how to free Up Disk Space In Windows
Turn off or decrease size of disk usage for system restore
If your not using the Windows System Restore feature, then why have it enabled?
If you are using it, perhaps you want to re-evaluate how much disk space its using up (which can be several GigaBytes) for saving checkpoints. If you only want to have 1 or 2 good saved checkpoints to restore from decrease the allocated space for system restore to a few hundred meg.
- Decrease the disk usage size of the recycle bin
The most common area on a users PC in which Windows allocates a chuck of space for itself is the recycle bin. If you rather have files be deleted instantly and not put in the recycle bin or you want to decrease the space it uses to hold deleted files
- Empty or Decrease your Web Browsers disk usage for Cached files
Every web browser has a preferences or options area to adjust the temporary internet files and cache usage. In this video tutorial we use Internet Explorer as an example on how to save space with an adjustment of the temporary internet files space it uses.
- Disable Hibernation in Windows.
If you don't know what Hibernation is , chances are you aren't using it. You might want to disable it to save a few Gigabytes of space that function requires as shown in the video tutorial.
For Vista users you can open command prompt and type powercfg -H off
-Run the Windows Clean Manager
Windows comes already with a built in cleaner that does simple basic tasks to free up disk space.
To access it click start -> Run -> type cleanmgr -> press OK
Thursday, August 29, 2019
How To Right Click Using Keyboard In Windows 7, 8, 8.1 and 10
1. Pressing the Win + E on your keyboard to open File Explorer, select one or more items you want to right click on.
2. Press the Shift + F10 keys.
3. You can now perform one of the 3 actions below to select an item in the context menu.
(see screenshot below)
a) Look for the underlined letter in the context menu of the item you want to select, and press that letter on the keyboard.
b) Press the arrow keys to navigate to and highlight the item you want in the context menu, and press Enter to select it.
c) Click/tap on the item you want in the context menu.
How To Increase Battery Life Of Laptop
# Step 1: Click on the Start Menu and type CMD
# Step 2: The search will start and it will then display an icon of CMD
# Step 3: simply right click on it and select Run as administrator.
# Step 4: It will open command line, now simply run the command “powercfg -energy” without quotes.
# Step 4: Press Enter
-----------------------------------------------------------------------------------------------------------------
# after check up , it will store report in System32 ( energy-report.html )
How to Add Application to Windows 10 Desktop Right-click Menu
How to add an application to desktop right-click menu
By default, when you right-click on the Windows 10 desktop, you will find only a few items such as “Display settings”, “Personalize” are included in the popup menu. You can add some commonly used items such as programs, apps to the right-click menu for easier access to them. To realize this, you will need to edit the registry. Do as follows.
Tips: Generally, people are advised to firstly backup Windows 10 registry before editing it just in case making mistakes. But then again, if you are careful enough, backup is unnecessary for such a simple operation on Registry.
Step 1: Open Registry Editor in Windows 10 by searching “regedit” in Start menu or running “regedit” in Run box.
Step 2: Navigate to HKEY_CLASSES_ROOT\Directory\Background\shell. Right-click on the “shell” entry and select New -> Key to create a new key. Name the new key the target program/app name you want to add to the Windows 10 desktop right-click menu, such as “Notepad”.

Step 3: Right-click on the new key, and select New -> Key to create a new subkey. Name the subkey “command”.

Step 4: Go to your Windows 10 root directory to find the full path to the app you want to add to the desktop right-click menu. You can right-click on the program while holding on the “Shift” key and select “Copy as path” to quickly copy its full path.

Step 5: Go back to the Registry editor. Select the “command” key you’ve just created in Step 3, and on the right-side pane double click on the Default value. Then paste the program path you just got in Step 4 to the “Value data” box and click “OK” to finish.

Step 6: Now, when you right-click on your Windows 10 desktop, you will find the Notepad application is added into the popup menu. Select the Notepad and Notepad will immediately open.

how to Speed Up Your Computer With Run Commands
Follow these Steps:
Follow the steps given below to improve computer speed and keep your computer safe.
Use Strong anti-virus to keep away your computer from Mall-ware and spyware.
Never log out system with out closing all the applications and folders.
Use Disk space cleaner tools to free disk space.
If you want to delete a file permanently use SHIFT+DELETE
Don't open too many folders or application at once.
Most common but yet we should remember this Refresh the computer every time when you log in.This can be done either by Functional key F5 or right click on the desktop screen and then click "Refresh" option.
RUN COMMANDS TO SPEED UP COMPUTER:
Use the following run commands to remove the systems temporary and recent files whenever you feel that system is working slowly with that you can improve computer processing.
Open Run command and type the following commands one-by-one and delete those files and folders permanently from your computer.Some of the files won't delete then let it be and skip those files.
Run commands:
Temp
%Temp%
Recent
Prefetch
ipconfig
Create Shutdown, Hibernate & Sleep Shortcuts On Desktop In Windows 10
Windows 10, like its predecessors, offers multiple ways to access shut down, restart, hibernate and sleep options in Windows 10. You can access shut down options by clicking power button in the Start menu, or right-clicking on the Start menu and then clicking Shut down or sign out, or simultaneously pressing Alt + F4 keys after minimizing running programs.
Shut down options can also be accessed from the login screen as well as the Ctrl + Alt + Del screen which appears when you simultaneously press Ctrl + Alt + Del keys. And for those who would like to shut down, restart, hibernate or sleep using keyboard shortcuts, there are ways to shut down, restart, hibernate or sleep Windows 10 using keyboard shortcuts as well. On top of that, you can also use Cortana to shut down, restart, hibernate and sleep your Windows 10 PC.
A large chunk of PC users running Windows 10 prefer accessing shut down options by navigating to the Start menu. If the Start menu is not opening for some reason, one can always right-click on the Start button to access these shut down option. While most users prefer using these built-in options to access shut down options, there are users who prefer having shut down, restart, hibernate, sleep and sign out options on the desktop for easy access.
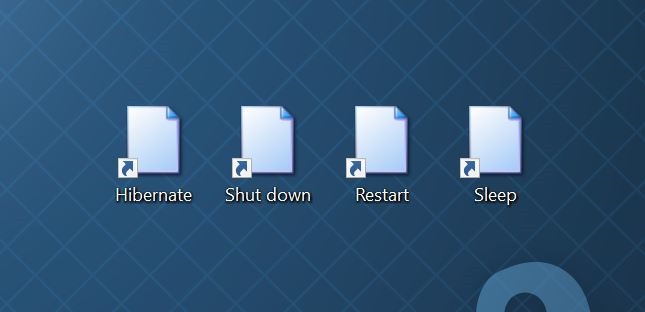
Create shut down, hibernate, restart, and sleep shortcuts on Windows 10 desktop
If you also prefer having shut down, restart, hibernate, sleep and sign out options on the desktop, you can do so by following given below directions.
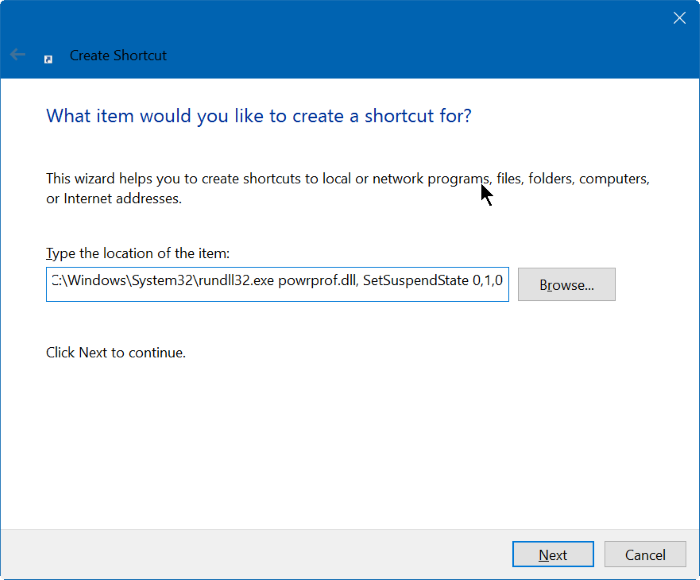
Step 1: Right-click on the empty area of the desktop, click New, and then click Shortcut to open Create shortcut wizard.

Step 2: On the home screen of Create Shortcut wizard, type the following commands shut down, restart, hibernate, sleep and sign out Windows 10. After entering a command, click Next button.
For shutdown:
Shutdown.exe
For restart:
shutdown -r -t 0
For log off:
Logoff: shutdown -l -t 0
For hibernate:
rundll32.exe powrprof.dll, SetSuspendState 0,1,0
In the above command, replace “C” with the drive letter of the drive where Windows 10 is installed.
Important: If hibernate feature is turned on, the Hibernate command will put your PC into hibernation. When hibernation is turned off, the same command will put your PC in to sleep mode.
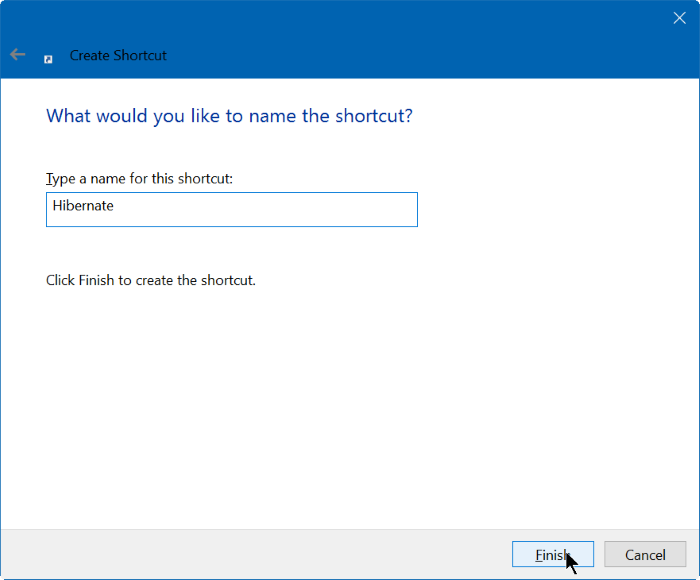
Step 3: Finally, you need to give a name for your new shortcut. If you have entered shut down command, name the shortcut as shut down and then click Finish button to create the shortcut on the desktop. By following this procedure and using above mentioned commands, you can create desktop shortcuts for shut down, hibernate, restart, sleep and sign out operations.
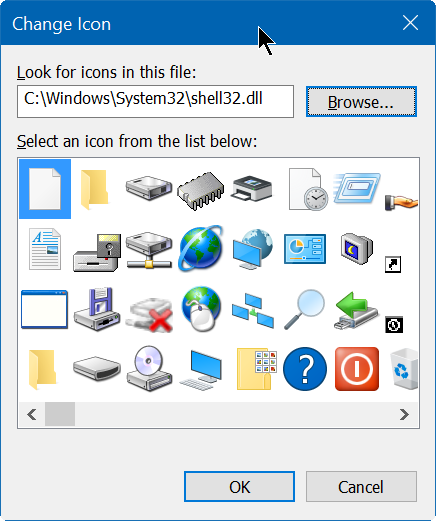
Tip: If you want to change the default boring icon of a desktop shortcut, right-click on the newly created shortcut on the desktop, click Properties, click Change Icon button, and then select one of the available icons. If you want to choose a custom icon, click the Browse button and then navigate to the icon file (the file must be in .ico format).
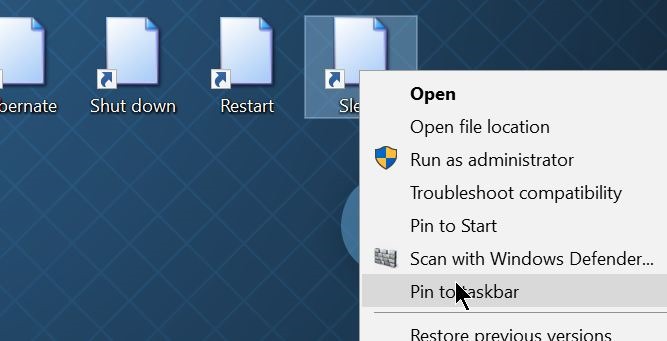
Pin shut down, hibernate, and sleep shortcuts to taskbar in Windows 10
Step 1: Follow the above mentioned procedure to create shut down, hibernate, restart, and sleep shortcuts on Windows 10 desktop.
Step 2: Once you have these shortcuts on desktop, right-click on a shortcut and then click Pin to taskbar option.
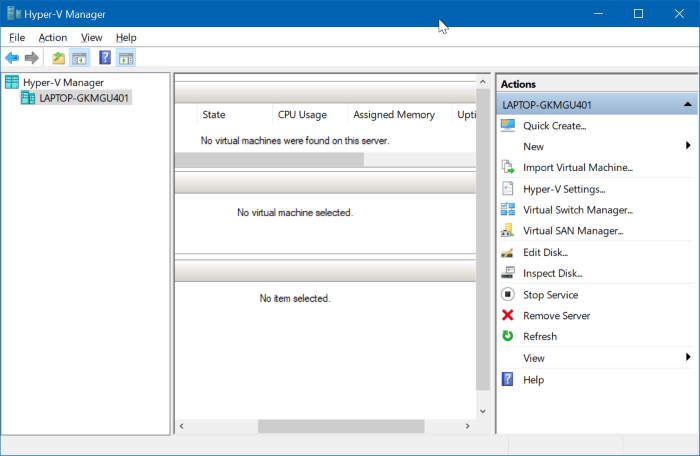
How To Enable Hyper-V In Windows 10
The built-in Hyper-V tool in Windows 10 lets you create and run virtual machines. It supports all releases of Linux, FreeBSD, and Windows operating system.
IMPORTANT: Hyper-V is not part of the Windows 10 Home edition. It’s available only in Pro, Enterprise and Education editions. Also, Hyper-V does not support 32-bit Windows 10, even if you are running Enterprise, Education or Pro.
Hyper-V requirements
1. Windows 10 Pro, Enterprise, or Education edition
2. 4 GB or more RAM
3. 64-bit processor with SLAT
4. CPU support for VM Monitor Mode Extension (VT -c on Intel CPUs)
Check if your PC supports Hyper-V
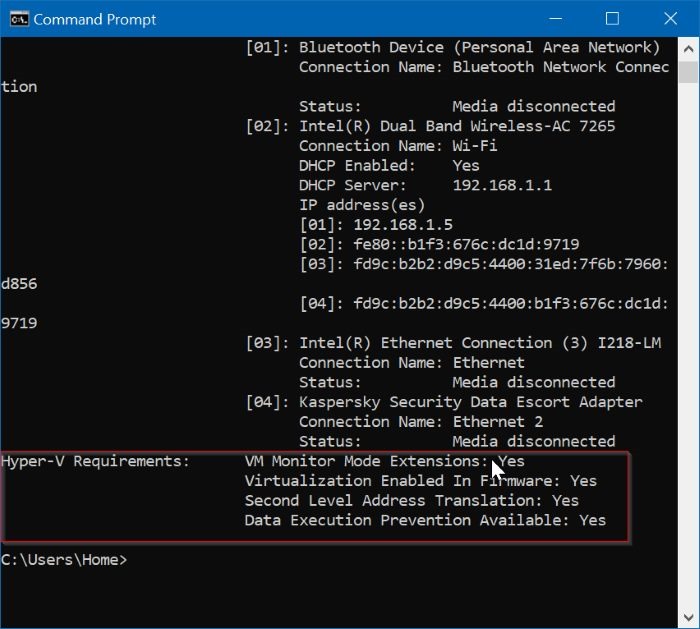
Step 1: Open the Command Prompt. Type Systeminfo and then hit the Enter key.
Step 2: Navigate to the Hyper-v Requirements section to know if all features required for Hyper-V are turned on.
While the Hyper-V is a built-in feature, it’s not enabled by default. You need to enable the Hyper-V feature to be able to use it.
Windows 10 offers multiple ways to enable the Hyper-V feature. You can enable it via Control Panel, PowerShell or DISM.
Complete the given below directions to enable the Hyper-V in Windows 10.
Method 1 of 3
Enable Hyper-V via Control Panel
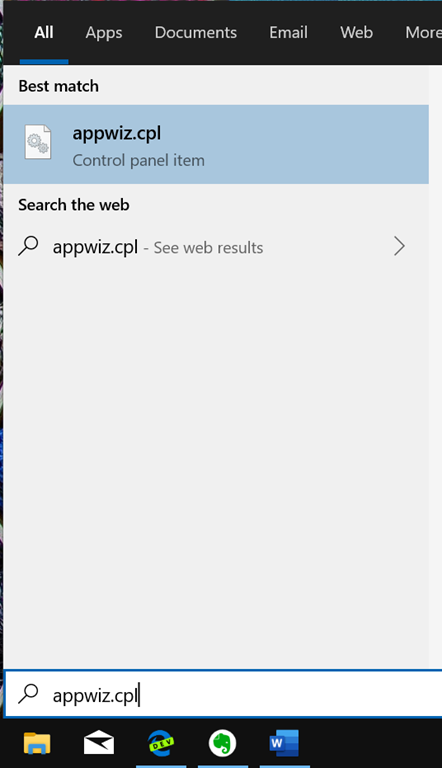
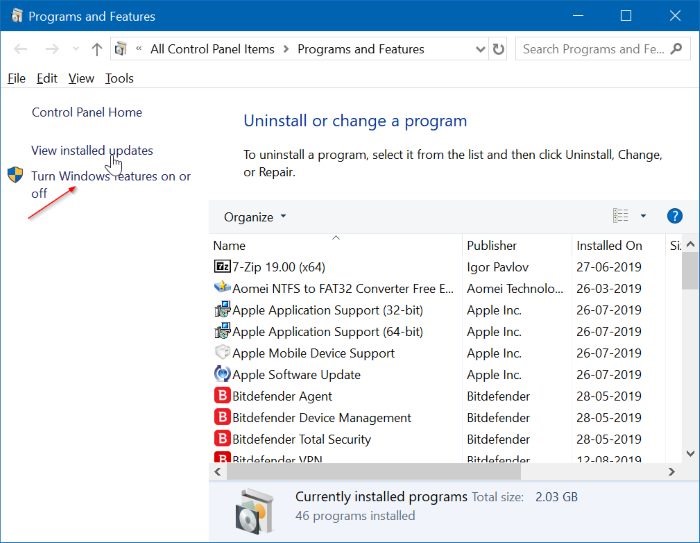
Step 1: Type appwiz.cpl in the Start/taskbar search box and then hit the Enter key to open Programs and Features window.
Step 2: On the left pane of the window, click the Turn Windows features on or off link. Clicking the link will open Windows features window.
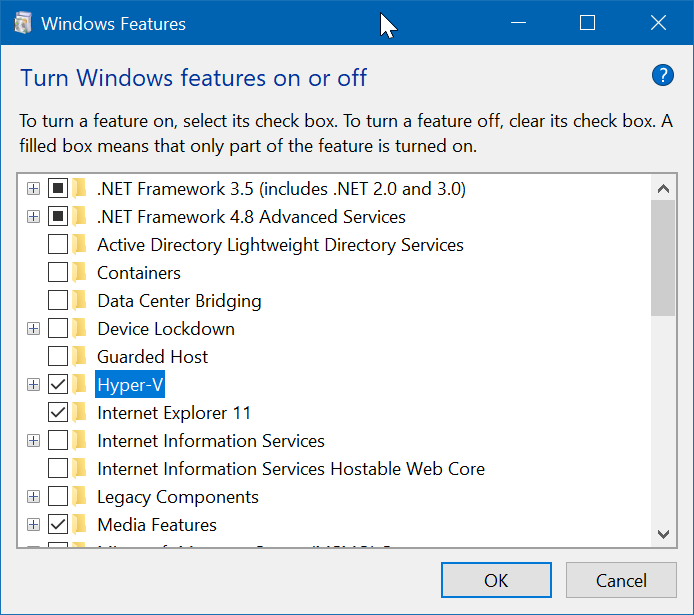
Step 3: Here, locate the Hyper-V entry. Select the checkbox next to the entry and then click the OK button.
Method 2 of 3
Enable Hyper-V via PowerShell
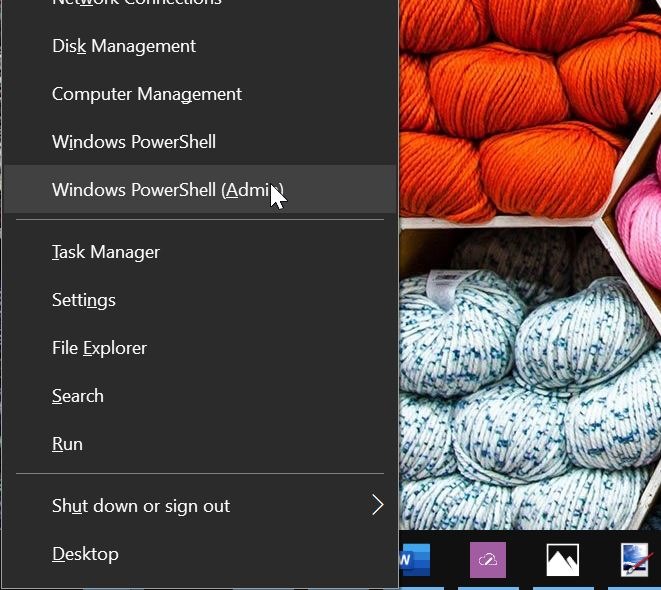
Step 1: Open the PowerShell as an administrator. To do so, right-click on the Start button, and click Windows PowerShell (admin).
Click on the Yes button when you get the User Account Control prompt.
Step 2: At the PowerShell window, copy and paste the following command:
Enable-WindowsOptionalFeature -Online -FeatureName Microsoft-Hyper-V -All
Press the Enter key to run the command.
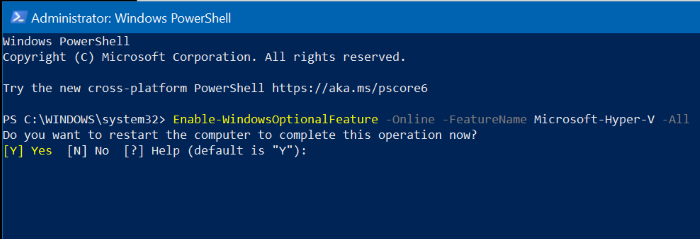
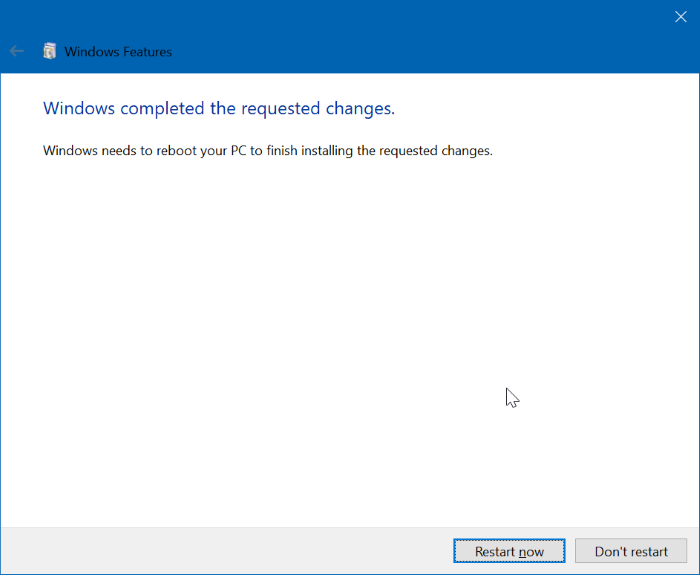
Once the installation is completed, restart your computer.
Method 3 of 3
Enable Hyper-V via Command Prompt and DISM
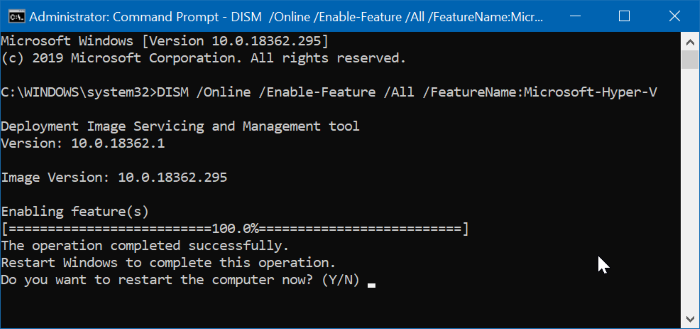
Step 1: Run Command Prompt as administrator.
Step 2: Copy and paste the following command at the Command Prompt window and hit the Enter key:
DISM /Online /Enable-Feature /All /FeatureName:Microsoft-Hyper-V
Best Free VPN Services
Here’s a listing of services offering FREE VPN accounts. You need to bear in mind that Free VPN services might have some restrictions like low bandwidth, speed limitations, no tech support team etc.
1. UltraVPN
A Totally Free VPN according to OpenVPN
UltraVPN is really a free VPN client according to OpenVPN. UltraVPN is really a client/server SSL VPN which encrypts and anonymizes your online network connection. It utilizes a simple interface and you will connect or disconnect it by right hitting a tray bar icon. To begin utilizing it, you have to download the UltraVPN free VPN client after which login making use of your username, password.It supports Home windows and Mac Os. Also, No connection or traffic logs are stored and therefore you shouldn’t be worried about any logs being stored.
The free application when downloaded within the system, it dwells in your body tray. Perfect click the icon within the tray and then click the connect button. You’re attached to the VPN cluster, whereby an use of the blocked internet sites, Voice over internet protocol programs as well as safeguard your email and browsing privacy.
The free application is safe to make use of, while you make use of this free software using the source code because it is or alters it based on your choice. It encrypts and anonymizes your network connection to ensure that it is simple to use in the net world where access to the internet is fixed for any purpose. The interface from the application is extremely simple and easy, thus a novice may use the VPN service easily.
2. PacketiX.Internet
Academic, non-profit online atmosphere for PacketiX VPN
PacketiX.Internet is definitely an academic, non-profit online atmosphere for PacketiX VPN (Premium VPN service) with all of its servers located in Japan. Using Packetix.internet VPN, you may create private Virtual VPN Hub and may create a remote connection to your house network or joining together local systems at different sites. It encrypts all of your Internet data communication via SSL on the secure gateway server. Developing a Virtual Hub is extremely simple and easy, can be achieved easily while using the web interface of Packetix.internet.
To make use of this free service you need to download and install VPN connection manager for your system and fasten towards the private network that you need to access. The applying is designed to transport the network data packets independently, using file encryption. Thus you are able to securely access the data out of your office computer right out of your home.
Generally, to be able to access the remote systems, you need to create global Ip on your own after which use of VPN servers, whereas by using this free software, you receive the advantage of using already produced VPN hub in which you do not need to setup a VPN server having a global Ip yourself. You may also administer VPN server easily using the web interface, thus this free software may also be used by customers a newcomer to VPN services.
3. Hotspot Shield
Private, Secure & Complete Use of Web!
Hotspot Shield safeguards your web identity by acquiring your internet session, data, shopping online, and private information online with HTTPS file encryption. Celebrate identity invisible by hiding your Ip to 3rd party websites and ISP’s. It supports Home windows, Mac Os including Home windows 7 and Macosx Lion.
You may also hide your privacy online from burglars as you can assure of saving your vital information. The application is developed to be able to supply you simply to use web interface while you have access to any or all content independently without censorship and bypass firewalls. The applying is needed to become downloaded on the internet site and you will launch it for your system.
The applying is totally liberated to download and you will steer clear of the snoopers within the Wi-fi compatibility ‘hang-outs’ to red-colored your packet data. The applying transfers data packets with file encryption to ensure that no one other than reading this content of the data and you’re simply protected from burglars. You may also make use of this free software inside your on corporate atmosphere and use of those sites and web programs that access is fixed.
4. Loki Network Project
Free of charge VPN service and SSL based free VPN server
Loki Network Project is free of charge VPN service/ server according to SSL. It will help you safeguard your private data like Ip, e-****/FTP/HTTP passwords, websites visited, submitted/downloaded files etc. and bypasses certain Access to the internet restrictions you might have at the location. It redirects all your computer data or network packets with the established SSL tunnel towards the Loki VPN Server serving as Internet Gateway (NAT).
5. ProXPN
proXPN is really a free VPN service which obtains your existing web connection by developing a secure, highly encoded link between your pc and also the Internet. This secure, highly encoded connection safeguards your identity and activity online. No records of the activity are stored (unlike an ordinary web connection). It uses Military-grade high-bit file encryption and makes your online connection cryptographically guaranteed. It works with Home windows XP, Vista, and 7 (32 & 64 bit), Macosx 10.5.6 and then. It even works together with apple iPhone & Android.
6. Securitykiss Tunnel
SecurityKISS redirect all of your online data and traffic with an impenetrable tunnel to security kiss security gateway. bye, acquiring and encrypting the information. My way through the tunnel is encoded to help you: Be sure that your passwords, charge card amounts, shopping online and every one of your computer data is guaranteed; Safeguard yourself from snoopers at Wireless ‘hang-outs’, hotels, international airports, corporate offices; Safeguard your computer data from being intercepted by various network sniffers; Safeguard yourself from id theft online.
7. Free US VPN- PPTP VPN based service
Free US VPN is really a Free VPN service that unblocks websites and secure access to the internet and keeps no track. Clients are capable of guaranteed 2Mbit/s data transfer speed and 1Mbit/s upload speed for every Free PPTP VPN session without any packet loss and incredibly low network jitter provided their very own web connection supports that speed. The only problem here would be that the Password free of charge VPN service changes every 12 hrs and you have to go to the website to find the new password.
8. Expatshield
Expat Shield is really a United kingdom-based Free VPN company and you receive a United kingdom Ip for the system while using it. It hides your Ip, bypasses firewalls, obtains your internet session, data, shopping online, and private information online with HTTPS file encryption.
9. LogMeIn Hamachi
Located Free VPN service
LogMeIn Hamachi is really a located VPN service which safely connects products and systems, create secure virtual systems when needed, across private and public systems. It’s handled and maintained everywhere through the web, safely. A free version of LogMeIn Hamachi may be used 100% free for non-commercial use and it is restricted to 16 computer systems.
Wednesday, August 28, 2019
The Differences Between MBR and GPT

Master Boot Record (MBR)
MBR is the old standard for managing the partition in the hard disk, and it is still being used extensively by many people. The MBR resides at the very beginning of the hard disk and it holds the information on how the logical partitions are organized in the storage device. In addition, the MBR also contains executable code that can scan the partitions for the active OS and load up the boot up code/procedure for the OS.
For a MBR disk, you can only have four primary partitions. To create more partitions, you can set the fourth partition as the extended partition and you will be able to create more sub-partitions (or logical drives) within it. As MBR uses 32-bit to record the partition, each partition can only go up to a maximum of 2TB in size. This is how a typical MBR disk layout looks like:
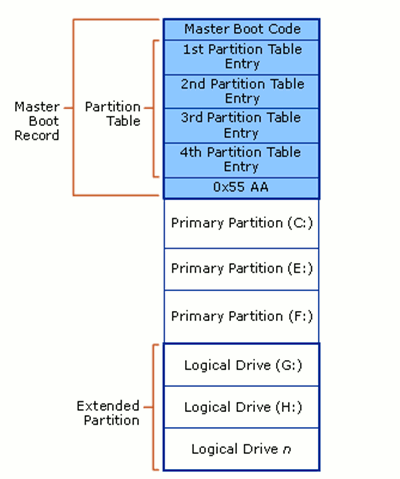
There are several pitfalls with MBR. First of all, you can only have 4 partitions in the hard disk and each partition is limited to only 2TB in size. This is not going to work well with hard disk of big storage space, say 100TB. Secondly, the MBR is the only place that holds the partition information. If it ever get corrupted (and yes, it can get corrupted very easily), the entire hard disk is unreadable.
GUID Partition Table (GPT)
GPT is the latest standard for laying out the partitions of a hard disk. It makes use of globally unique identifiers (GUID) to define the partition and it is part of the UEFI standard. This means that on a UEFI-based system (which is required for Windows 8 Secure Boot feature), it is a must to use GPT. With GPT, you can create theoretically unlimited partitions on the hard disk, even though it is generally restricted to 128 partitions by most OSes. Unlike MBR that limits each partition to only 2TB in size, each partition in GPT can hold up to 2^64 blocks in length (as it is using 64-bit), which is equivalent to 9.44ZB for a 512-byte block (1 ZB is 1 billion terabytes). In Microsoft Windows, that size is limited to 256TB.

From the GPT Table Scheme diagram above, you can see that there is a primary GPT at the beginning of the hard disk and a secondary GPT at the end. This is what makes GPT more useful than MBR. GPT stores a backup header and partition table at the end of the disk so it can be recovered if the primary tables are corrupted. It also carry out CRC32 checksums to detect errors and corruption of the header and partition table.
You can also see that there is a protective MBR at the first sector of the hard disk. Such hybrid setup is to allow a BIOS-based system to boot from a GPT disk using a boot loader stored in the protective MBR’s code area. In addition, it protects the GPT disk from damage by GPT-unaware disk utilties.
OS Support
Intel Macs are using GPT by default and you won’t be able to install Mac OS X (without tweaks and hacks) on a MBR system. Mac OS X will run on MBR disk though, it is just that you won’t be able to install on it.
Most Linux kernels come with support for GPT. Unless you are compiling your own kernel and you didn’t add this feature in, you should have no problem getting your favorite distro to work in GPT disk. One thing to note, you wil have to use Grub 2 as the bootloader.
For Windows, only the 64-bit version of Windows from XP onward support booting from GPT disk. If you are getting a laptop pre-installed with 64-bit Windows 8, most probably it is using GPT. For Windows 7 and earlier version, the default configuration will be MBR instead of GPT.
Conclusion
In most cases, you will be fine with either MBR or GPT. It is only in situation where you need to install Windows on a Mac, or when you need to have a partition bigger than 2TB, that you need to use GPT, or convert MBR to GPT. Also, for the newer model of computer that uses UEFI, it will only support GPT.
Difference Between UEFI and Legacy Boot

The main difference between UEFI and legacy boot is that the UEFI is the latest method of booting a computer that is designed to replace BIOS while the legacy boot is the process of booting the computer using BIOS firmware.
UEFI is a new booting method that addresses the limitations of BIOS. It is managed by a group of chipset, hardware, system, firmware and OS vendors called UEFI Forum. Legacy boot is the regular method of booting the system using BIOS. In brief, UEFI provides additional security features and fast processing on the computer. It offers a secure boot that can avoid loading boot time viruses.
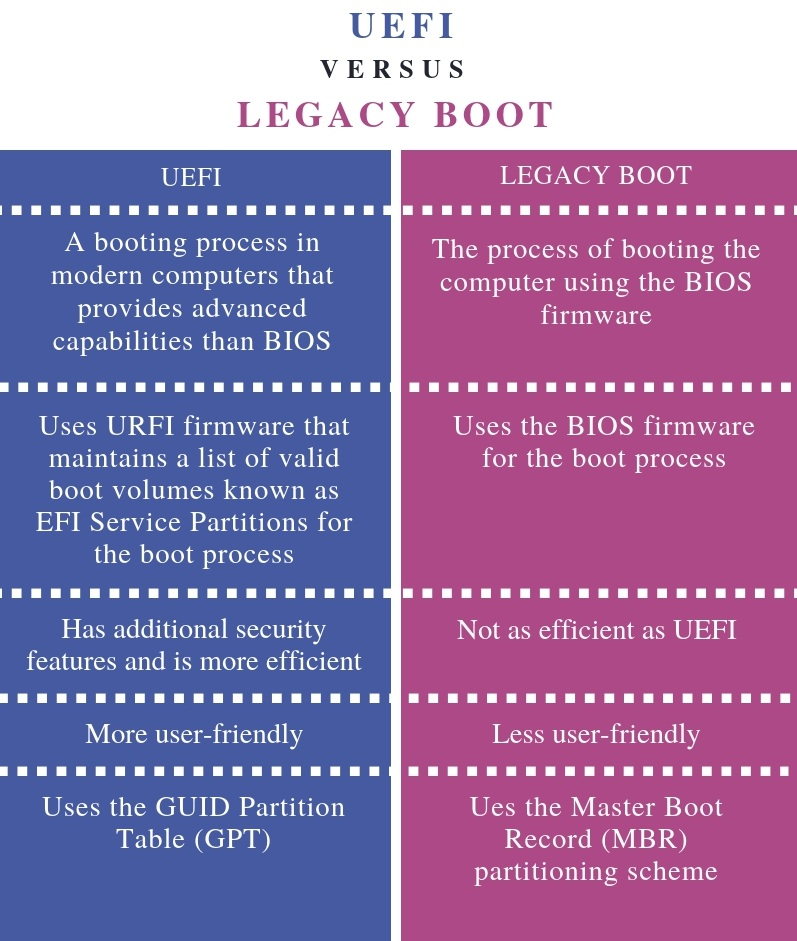
What is UEFI
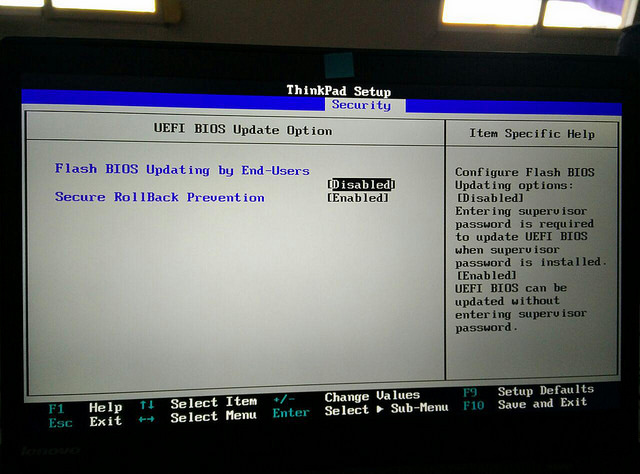
UEFI stands for Unified Extensible Firmware Interface. Most new motherboards consist of this new type. It has more advantages than using BIOS. Most importantly, it provides a user-friendly Graphical User Interface (GUI). BIOS provides a blue color screen with various options. The normal BIOS cannot recognize large storage drives. UEFI provides a good alternative to this issue and recognizes large storage drives.
In regular BIOS that uses the keyboard to select the options, UEFI allows controlling the interface using the mouse. Moreover, UEFI contains a secure boot. It avoids any digitally unsigned drivers from loading and helps to prevent any malicious software. Some computers with UEFI allows the user to enable legacy BIOS compatibility mode.
UEFI boot uses the UEFI firmware. It maintains a list of valid boot volumes called EFI service partitions. During Power On Self-Test (POST), which checks whether all hardware is functioning properly, the UEFI firmware scans all the bootable storage devices that are connected to the system for a valid GUID Partition Table (GPT). The firmware itself checks the GPT to find an EFI partition to boot from.
What is Legacy Boot
Legacy Boot is the boot process used by BIOS firmware. It stores a list of installed storage devices that are bootable such as Floppy Disk Drives, Hard Disk Drives, Optical Disk Drives, etc. according to a configurable order of priority. When power on the computer, the BIOS performs Power On Self-Test (POST). Then the internal speaker makes a short single beep to indicate that the booting up is normal. The beep code helps to identify the code and to act on further troubleshooting.
After completing POST procedure, the firmware loads the first sector of each of the storage target into memory. Then, it scans it for a valid Master Boot Record (MBR). If a valid MBR is found, the firmware passes execution to the bootloader to select a partition to boot from. If one is not found, it proceeds to the next device in the boot order.
Difference Between UEFI and Legacy Boot
Definition
UEFI is a booting process in modern computers that provides advanced capabilities than BIOS. Legacy Boot is the process of booting the computer using the BIOS firmware. This explains the basic difference between UEFI and legacy boot.
Functionality
Moreover, UEFI uses URFI firmware that maintains a list of valid boot volumes known as EFI Service Partitions for the boot process. Legacy boot uses the BIOS firmware for the boot process.
Features
Another important difference between UEFI and legacy boot is that UEFI has additional security features and is more efficient than legacy boot.
User Friendliness
Also, UEFI is more user-friendly than legacy Boot.
Checking the Bootable Storage
While UEFI uses the GUID Partition Table (GPT), BIOS uses the Master Boot Record (MBR) partitioning scheme.
Conclusion
The difference between UEFI and legacy boot is that UEFI is the latest method of booting a computer that is designed to replace BIOS while legacy boot is the process of booting the computer using BIOS firmware. In brief, UEFI is the successor to BIOS.
Boost Internet Speed By 20% Without Any Software
Increase internet speed by 20% Without Any Software
Microsoft reserves 20% of your available bandwidth for their own purposes like
Windows Updates and interrogating your PC etc.
By unreserving this bandwidth, you can make your internet connection faster.
By 20%. The steps to be followed are:
1. Click Start then Run and type "gpedit.msc" without quotes.
2. Then go to Local Computer Policy>Computer Configuration>Administrative Templetes>Network>QoS Packet Scheduler. Click on QoS Packet Scheduler. In the right side , find Limit Reservable Bandwidth and double click on Limit Reservable Bandwidth.
3. It will say it is not configured but the truth is under the ‘Explain’ tab. Select ‘Enable’ and set reservable bandwidth to zero.
4. Click on ‘Apply’ and your internet speed will boost up by 20%.
Steps :-


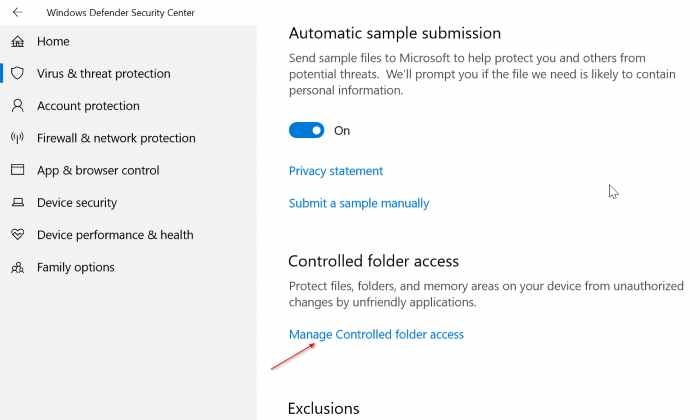
Turn On Built-in Ransomware Protection In Windows 10
Method 1 of 2
Turn on Controlled Folder Access in Windows 10
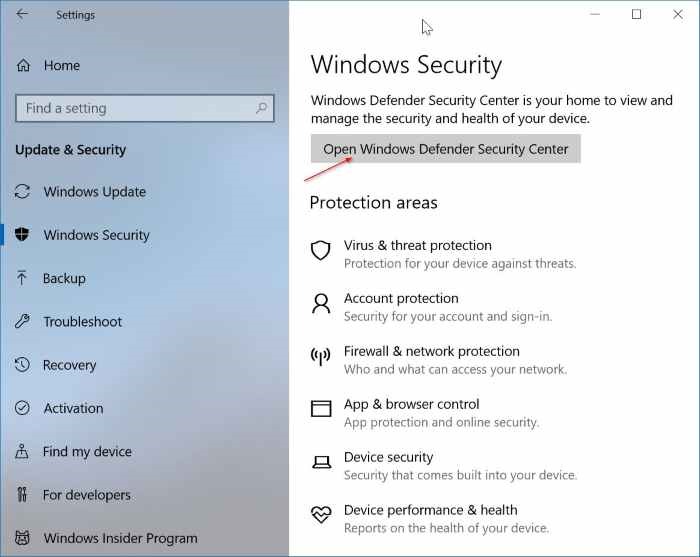
Step 1: Open the Settings app. Navigate to Update & security > Windows Security (Windows Defender).
Step 2: Click Open Windows Defender Security Center button.
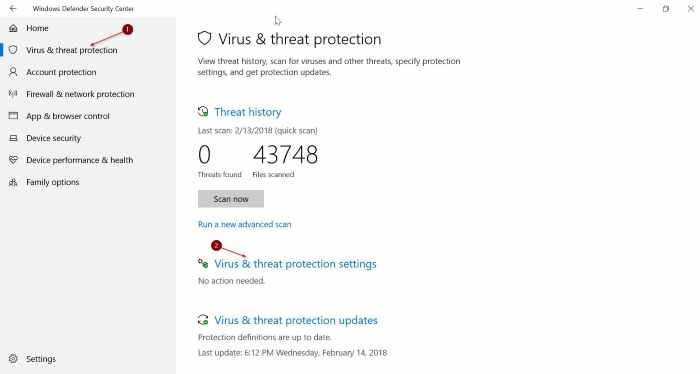
Step 3: Click Virus & threat protection. Now click Virus & threat protection settings link.
Step 4: In the Controlled Folder Access section, click Manage Controlled folder access link.
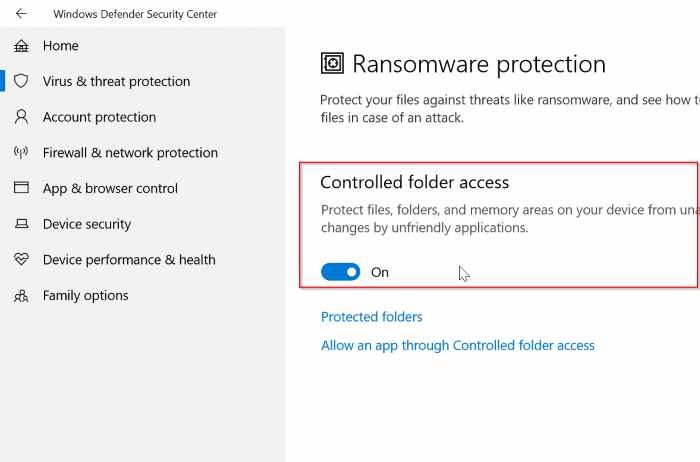
Step 5: Move the Controlled folder access switch to the “On” position to turn on the ransomware protection. Click Yes button if you get the User Account Control prompt.
Step 6: Now, click Protected folders link, click Add a protected folder option and then add a folder that you want to protect from ransomware. If you want to protect multiple folders, please add them one-by-one.
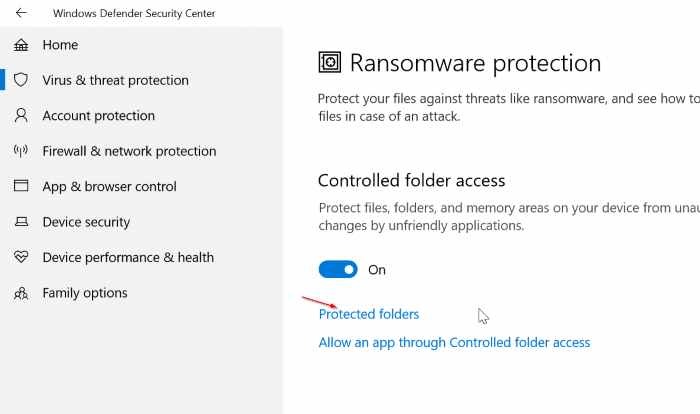
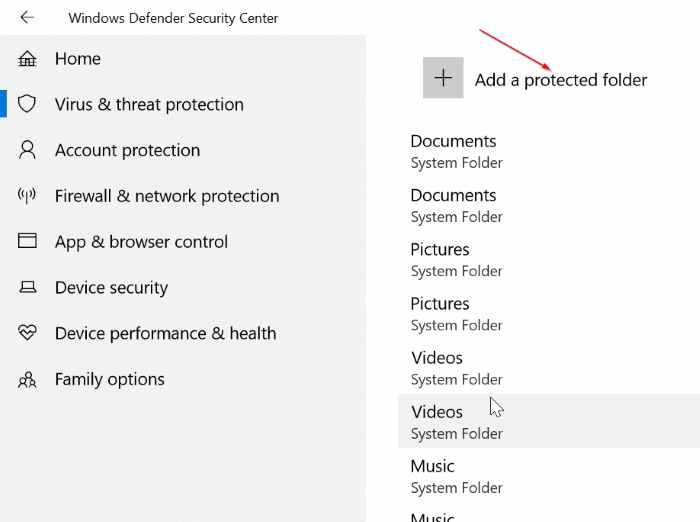
Note that many of the library folders such as the desktop, documents, pictures, and videos are protected by default. It’s important to note that you can add additional folders to the default list but cannot remove folders from the default list.
Step 7: Most of the common apps will be allowed to access files in Controlled Folder Access, but if you want to allow an unknown program to access these folders, you can add it here.
Finally, click Allow an app through Controlled folder access link to add apps that you want to allow to make changes to files in these protected folders.
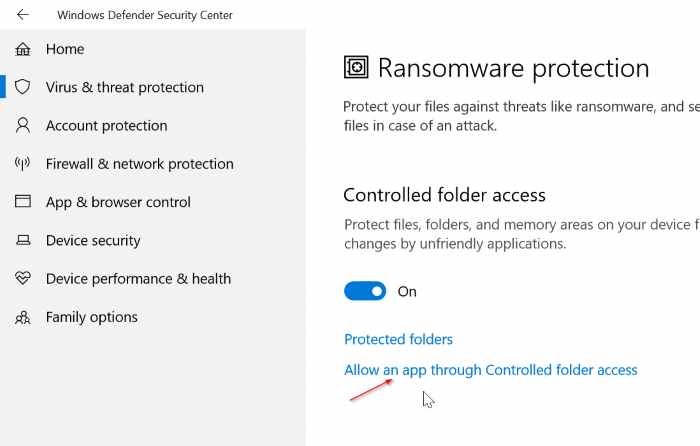
That’s it! You have now set up the built-in ransomware protection in Windows 10.
Method 2 of 2
Enable and configure Controlled Access via PowerShell
In addition to Windows Defender Security Center, one can also use the PowerShell to enable the Controlled Access and add folders to it.
Step 1: Open PowerShell as administrator. At the PowerShell window, type the following command and then press Enter key to turn on Controlled Folder Access.
Set-MpPreference -EnableControlledFolderAccess Enabled
Step 2: Lastly, to add folders to the default list, use the following cmdlet.
Add-MpPreference -ControlledFolderAccessProtectedFolders “<the folder to be protected>”
How to delete local user accounts on Windows 10
Step 1: Steps to Remove a User Account in Settings
Press Windows key, click on Settings.
Click on Account, click on Family and other users.
Select the user you want to delete under Other users and click on Remove.
Accept the UAC (User Account Control) prompt.
Select Delete account and data if you wish to delete account and the data and follow onscreen instructions.
OR
Step 2: Steps to Delete a User Account in Command Prompt
Press Windows + X keys from the keyboard, select Command Prompt (Admin).
Type net user and hit Enter to list the user accounts on your device.
Type net user "User account " /delete and hit Enter to delete the user account.
Find the IMEI number of lost phone (iPhone, Android & WP)
For most mobile devices, IMEI number can be found out by dialling ‘*#06#’. But how do you find the IMEI number once your phone is lost or stolen? In this article, we’ll explore where to look for the IMEI number of your lost phone
Locate IMEI number of lost smartphone
The IMEI number for iPhone, Android or Windows Phone device may be easily found even after the device gets stolen. The following section will guide you to find the IMEI number for these smartphones.
Find IMEI number of lost iPhone
To get the IMEI number of your lost iPhone, you need to have at least one device backup available in iTunes on your computer. Follow the steps given below to find the IMEI number of your lost iPhone from an iTunes backup.

Launch iTunes on the computer containing the backup.
Go to iTunes Menu >> Preferences and select Devices tab. Your iPhone backups will be displayed under the Device Backups section.
Hover the mouse pointer over any of the backups and wait for the details to appear. Your iPhone’s IMEI number will be present among other details in the tooltip message.
Find IMEI number of lost Android phone
The IMEI number of your Android device is synced to your Google account when you register your device for Google Play services. To find out the IMEI number of your lost Android device, follow the steps below:
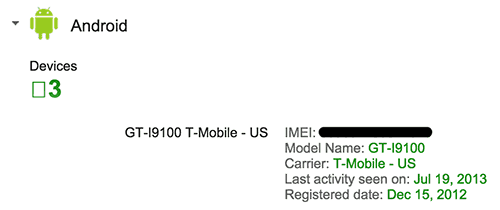
Navigate to “google.com/settings” on your web browser and sign in to the Google account you used to register the lost device.
Scroll down and select Dashboard under Account tools. You may be asked to re-enter your Google account password.
In the Dashboard view, expand the Android section to find your registered Android devices.
The IMEI number of the registered phone will be displayed along with other device details. If you have multiple Android devices registered under the same account, make sure you note the IMEI number of the correct (lost) device.
Find IMEI number of lost Windows Phone
Microsoft also stores information regarding registered Windows Phone devices and this information can be accessed by logging into your Microsoft Account. Follow the steps below to find out the IMEI number of your registered Windows Phone device in case it is lost.
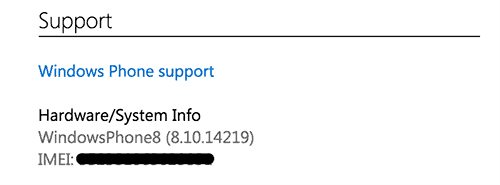
Login to “accounts.microsoft.com” and login with the Microsoft account used to register your lost Windows Phone device.
Go to the Phones tab and select the particular device. Click on the link that says, “Find it, get support, and more…” adjacent to the device.
Scroll down to the Support section. Here, under “Hardware/System Info”, you can find the current OS version and the IMEI number of the device.
Other ways to locate IMEI number
If your phone is lost or stolen, and it doesn’t run either of the three smartphone platforms mentioned above, your options to find the IMEI number are fairly limited. If you still retain the box in which your device came in, the IMEI number should be printed on the side of the box in barcode and text form. You may also find the IMEI number in the bill issued by the seller on purchase of the device.
Once the IMEI number is found, call up your network provider and request them to block the stolen device using it. Once blacklisted, the device can’t be used to make calls on any cellular network, thus rendering it useless.
Is there any other way to find out the IMEI number of a lost phone that we might have missed? Let us know in the comments below.
Locate IMEI number of lost smartphone
The IMEI number for iPhone, Android or Windows Phone device may be easily found even after the device gets stolen. The following section will guide you to find the IMEI number for these smartphones.
Find IMEI number of lost iPhone
To get the IMEI number of your lost iPhone, you need to have at least one device backup available in iTunes on your computer. Follow the steps given below to find the IMEI number of your lost iPhone from an iTunes backup.
Launch iTunes on the computer containing the backup.
Go to iTunes Menu >> Preferences and select Devices tab. Your iPhone backups will be displayed under the Device Backups section.
Hover the mouse pointer over any of the backups and wait for the details to appear. Your iPhone’s IMEI number will be present among other details in the tooltip message.
Find IMEI number of lost Android phone
The IMEI number of your Android device is synced to your Google account when you register your device for Google Play services. To find out the IMEI number of your lost Android device, follow the steps below:
Navigate to “google.com/settings” on your web browser and sign in to the Google account you used to register the lost device.
Scroll down and select Dashboard under Account tools. You may be asked to re-enter your Google account password.
In the Dashboard view, expand the Android section to find your registered Android devices.
The IMEI number of the registered phone will be displayed along with other device details. If you have multiple Android devices registered under the same account, make sure you note the IMEI number of the correct (lost) device.
Find IMEI number of lost Windows Phone
Microsoft also stores information regarding registered Windows Phone devices and this information can be accessed by logging into your Microsoft Account. Follow the steps below to find out the IMEI number of your registered Windows Phone device in case it is lost.
Login to “accounts.microsoft.com” and login with the Microsoft account used to register your lost Windows Phone device.
Go to the Phones tab and select the particular device. Click on the link that says, “Find it, get support, and more…” adjacent to the device.
Scroll down to the Support section. Here, under “Hardware/System Info”, you can find the current OS version and the IMEI number of the device.
Other ways to locate IMEI number
If your phone is lost or stolen, and it doesn’t run either of the three smartphone platforms mentioned above, your options to find the IMEI number are fairly limited. If you still retain the box in which your device came in, the IMEI number should be printed on the side of the box in barcode and text form. You may also find the IMEI number in the bill issued by the seller on purchase of the device.
Once the IMEI number is found, call up your network provider and request them to block the stolen device using it. Once blacklisted, the device can’t be used to make calls on any cellular network, thus rendering it useless.
Is there any other way to find out the IMEI number of a lost phone that we might have missed? Let us know in the comments below.
Mirror Function Setup for LED,LCD TV Universal Main Board
1. Press: Menu +8896.
2. Enter into: Factory Setting.
3. Enter into: Panel Control.
4. Select: Mirror on /Off.
2. Enter into: Factory Setting.
3. Enter into: Panel Control.
4. Select: Mirror on /Off.
Factory Settings:LED,LCD TV Universal Main Board
1. Menu–remote control press 8896–factory setting
2. Screen Specification Adjustment: Factory setting–Use the right key to choose–MAP data
2. Screen Specification Adjustment: Factory setting–Use the right key to choose–MAP data
SERVICE MODE: LED,LCD TV Universal Main Board
1. Press Menu ,then the LCD will have menu on the screen,
2. Press the number keys 8,8,9,6 ,a menu appears on the screen ,
3. Select SYSTEM SETTING and enter,
4. Select Panel Setting ,tone 1,2,3,4 .. . . . . . . After the the screen is ok, press ESC ,Done
2. Press the number keys 8,8,9,6 ,a menu appears on the screen ,
3. Select SYSTEM SETTING and enter,
4. Select Panel Setting ,tone 1,2,3,4 .. . . . . . . After the the screen is ok, press ESC ,Done
how to usb updating firmware LED,LCD TV Universal Main Board
step 1: Empty the pen disk.
Step 2: Copy the corresponding resolution program (*. Bin file) with the TXT file to U disk.
Step 3: Connect the U disk and TV Mainboard Via USB Interface.
Step 4: Connect the Keyboard and TV Mainboard.
Step 5: Connect power supply, check keyboard light. If light flashes, means firmware is being written; until light turns to Green, work is done.
(If light is not flashing, please cut off the power supply, then reconnect the USB, then connect the power supply again).
(Note: *During Step 5, the power supply can’t be paused* The same firmware can only be burned once time) After all done, use the remote control to turn on the tv (after burning the firmware, the mainbaord is on standby, the remote can wake up the tv)
LED,LCD Software Download Link (Universal Main Board }
https://drive.google.com/file/d/0BwNWOkjVGepMRXFXZ2lKUUk4bFk/view
https://www.mediafire.com/folder/vid4n2yz9v16a/tr_85_allll
https://drive.google.com/drive/folders/0B1f7UAyxuiYkbkRZV2tGdmlxZVE
https://drive.google.com/file/d/0B1f7UAyxuiYkU1NjRGpoQUItR1U/view
https://drive.google.com/drive/folders/0B9y4hFz51WjGWWJtZzhGMjVaa0E
https://www.mediafire.com/folder/vid4n2yz9v16a/tr_85_allll
https://drive.google.com/drive/folders/0B1f7UAyxuiYkbkRZV2tGdmlxZVE
https://drive.google.com/file/d/0B1f7UAyxuiYkU1NjRGpoQUItR1U/view
https://drive.google.com/drive/folders/0B9y4hFz51WjGWWJtZzhGMjVaa0E

How to Reduce Voltage with Resistors
How to Reduce Voltage in Half
To reduce voltage in half, we simply form a voltage divider circuit between 2 resistors of equal value (for example, 2 10KΩ) resistors.

To divide voltage in half, all you must do is place any 2 resistors of equal value in series and then place a jumper wire in between the resistors. At this point where the jumper wire is placed, the voltage will be one-half the value of the voltage supplying the circuit.
The 5V is now 2.5V. VCC is split in half.
How to Reduce Voltage to Any Value
You may not always want half the voltage, but you can get the voltage to any level you want choosing the appropriate resistor values for a voltage divider circuit.
Maybe your circuit is running off of 5V, yet you want only 3V to feed into a particular circuit element. How can you get the 5 volts into 3V?
And you can do so with the correct resistor values in a voltage divider circuit.
How do you calculate it?
The formula for calculating the voltage that falls across the R2 resistor is shown below.

But this formula, in its original form, does not help us in finding the resistor R2 we need for getting a particular voltage.
Rearranging this formula and solving for R2 yields the formula below.

This is the formula we can use for choosing the resistor value we need to get any voltage we want.
So back to our circuit, if we have 5 volts and want 3V from it, we use the formula above. If we use a 10KΩ as our R1 resistor, plugging in the values, we get R2= (V)(R1)/(VIN - V)= (3V)(10KΩ)/(5V - 3V)= 15KΩ. So we can use a 15KΩ resistor as our R2 resistor with the R1 resistor being 10KΩ.

Let's do one more example.
Say if you have the same circuit above with 5V but only want 1V. If we use a 10KΩ as our R1resistor, plugging in the values, we get R2= (V)(R1)/(VIN - V)= (1V)(10KΩ)/(5V - 1V)= 2.5KΩ. So we can use a 2.5KΩ resistor as our R2 resistor with the R1 resistor being 10KΩ.

So it's easy to see now how any voltage can be obtained with a resistor voltage divider circuit.
Subscribe to:
Posts (Atom)