Search This Blog

Sunday, August 15, 2021

How to Disable the Windows 10 Startup Delay

Open the Registry Editor by hitting Start and typing “regedit.” Press Enter to open the Registry Editor and then permit it to make changes to your PC.

Open Registry Editor App


In the Registry Editor, use the left sidebar to navigate to the following key (or copy and paste it into the Registry Editor address bar):HKEY_CURRENT_USER\SOFTWARE\Microsoft\Windows\CurrentVersion\Explorer\Serialize

Click the "Serialize" key.

If the Serialize key doesn’t already exist, you’ll need to create it. First, go to the following location:
HKEY_CURRENT_USER\SOFTWARE\Microsoft\Windows\CurrentVersion\Explorer\
Right-click on the parent key ( Explorer ) and choose New > Key. Name it “Serialize.”

Right-click "Explorer" and select New > Key.


Now, right-click the Serialize key and choose New > DWORD (32-bit) Value. Name the new value StartupDelayInMSec .

Name the key "StartupDelayInMSec".


Next, you’re going to modify that value. Double-click the new StartupDelayInMSecvalue and make sure the value is set to 0 in the “Value data” box.

Set the Value Data to "0".


Click “OK” and then exit Registry Editor. For the changes to take effect, you’ll need to restart your computer. You and any other users should no longer experience the delay forced upon you by Windows.

If you ever want to re-enable this delay because your startup programs are demanding too many resources upon signing in, head back into the Registry Editor and delete the StartupDelayInMSec value by right-clicking it and then clicking “Delete.”

Right-click the value and select "Delete" to undo your change.

Find Your Windows 10 Product Key Using a Windows Registry Method


First, open Notepad by right-clicking anywhere on the desktop, hovering over “New,” and then selecting “Text Document” from the menu.

Open a new text file

Copy and paste this code into Notepad:


Set WshShell = CreateObject("WScript.Shell")
MsgBox ConvertToKey(WshShell.RegRead("HKLM\SOFTWARE\Microsoft\Windows NT\CurrentVersion\DigitalProductId"))

Function ConvertToKey(Key)
Const KeyOffset = 52
i = 28
Chars = "BCDFGHJKMPQRTVWXY2346789"
Do
Cur = 0
x = 14
Do
Cur = Cur * 256
Cur = Key(x + KeyOffset) + Cur
Key(x + KeyOffset) = (Cur \ 24) And 255
Cur = Cur Mod 24
x = x -1
Loop While x >= 0
i = i -1
KeyOutput = Mid(Chars, Cur + 1, 1) & KeyOutput
If (((29 - i) Mod 6) = 0) And (i <> -1) Then
i = i -1
KeyOutput = "-" & KeyOutput
End If
Loop While i >= 0
ConvertToKey = KeyOutput
End Function
Next, click the “File” tab and select “Save As.”

save as in notepad


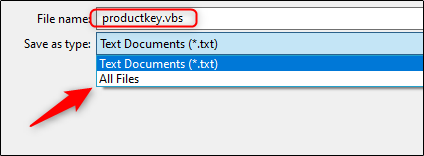
In File Explorer, set the “Save As Type” dropdown to “All Files” and give your file a name. You can use any name, but it has to be a .vbs file You can name it something like: productkey.vbs

save file type as vbs file

Once you’ve entered a file name, save the file.

You can now view your Windows 10 product key at any time by opening the new file.

product key

How to Find Your Windows 10 Product Key Using the Command Prompt


Find Your Windows 10 Product Key Using the Command Prompt

To find your Windows 10 product key using the Command Prompt, you’ll need to open the command line application with administrative privileges. To do this, type “cmd” in the Windows search bar.

type cmd in search bar


Command Prompt will appear in the search results. Right-click it and select “Run As Administrator” from the window that appears. If prompted, enter your Windows account password.

Run as admin option

Once open, copy and paste the following command and then hit the Enter key:
wmic path softwarelicensingservice get OA3xOriginalProductKey
The 25-digit product key will then appear.

Product key in Command prompt

Note: This method displays the Windows product key stored in your computer’s BIOS or UEFI firmware. In other words, it shows the original Windows key your computer came with. If you’ve installed Windows with a different key since then (or acquired a digital license), it will be different from the current key in use on your PC. If you want the current key in use on your PC,

Black Screen With Cursor (KSOD) on Windows 7, 8 and 10

 Method 1: System File Checker Scan in Safe Mode (Windows 8/8.1/10/7/Vista)

After you have logged in the safe mode with networking, hold Windows key and press R. Type cmd in the Run dialog and click OK. Then, type SFC /scannow in the black command prompt and hit Enter. Wait for the SFC to finish scanning, after it has finished scanning, reboot the computer and check if you are able to log in, if not the boot back into Safe Mode and continue with the steps below (system restore)


Method 2: System Restore in Safe Mode (Windows 8/8.1/10/7/Vista)


Click the Start button and type system restore in the Start Menu‘s search and hit Enter OR open run and type rstrui.exe then Click OK. You can open run by holding the windows key and pressing R.

Click the System Restore option from the search. After it loads up, place a check on Show More Restore Points and click Next.restore-points-more

Select a restore point by looking at the dates when your computer was working fine. Click Next and Finish. This will start system restore, and the computer will reboot after the reboot has finished. If the black screen issue still exists, follow the next method.


Method 3: Remove VGA/Display Driver In Safe Mode (Windows 8/8.1/10/7/Vista)


Reboot back into Safe Mode. After you are logged in, do the following steps:


Hold Windows key and press R

Type hdwwiz.cpl and click OK

Device Manager

Typing in hddwiz.cpl

Expand Display Adapters. (make a note of your display adapters name)

Right-click on it and select Uninstall.

After it has been uninstalled, reboot the PC back into normal mode and re-download the latest drivers.


Method 4 :alt+ctrl+del

selct new run type 'explorer'

and enter

and remove display driver