Search This Blog

Sunday, February 3, 2019

How to Put Universal Inverter for Laptops


Basically all the same laptop inverter, depending on the voltage it works. There was a 9-5V or 20V, depending on the type of laptop.


If we want to replace the inverter, so that we need to know is the position + POSITVE ; -Gnd as a source of electricity, and the ENA (enable) and DIP (to control bright / dim). Term other than ENA = Light On / DIP = Adjustment.
Then you can replace the inverter of the inverter used / universal inverter with the same voltage.
Inverter that I use to replace here, Universal inverter type, you can get it here.


In the picture is very clear, you just connect VIN = + U / ENA = ON / DIP = ADJ / GND = GND.

SOUTH BRIDGE CHIP SET VOLTAGE AND SIGNALS IN LAPTOP AND DESKTOP MOTHERBOARDS


1.RTC circuit: Southbridge internal real time clock circuit, also called CMOS circuits, mainly used to store the time and date and ESCD (Extended System Configuration Data)

.


2. Return circuit (module): is part of the South Bridge internal power management module, all the signals are thus SLP module circuit is completed.


3.VccSus: back module (module restart) power ICH4 inside, there are three V5REF_Sus VccSus3_3 VccSus1_5 and power.


Wherein VccSus3_3 return module I / O buffer circuit power;


VccSus1_5 is mains voltage return module '


V5REF_Sus return module 5V reference voltage input.


4.PWROK: This signal is sent to the ICH4M representative ICH4 core voltage of the normal power-good signal from the outside, when PWROK canceled, ICH4 will refer PCIRST #.


It is worth noting that in three of the RTC clock, PWROK failure. So as to ensure ICH4 produce normal PCIRST #.


5.VGATE / VRMPWRGD (VGATE / VRM Power Good): This is generated by the CPU core power manager output power to the representatives of CPU ICH4 normal power-good signal.


6.CPUPWRGD (CPU Power Good): This is ICH4 output to the CPU power of a good signal, is connected to the CPU. Southbridge asserts this signal is intended to tell all the CPU power is normal, you can put on standby. This signal is internally ICH4 after PWROK and VGATE / VRMPWRGD phase formation.


7.RSMRST #: Southbridge desired return module reset signal input.


8.SUS_STAT # (suspend statas): Pending status indication. When this signal is referenced, the system will enter a low power state.


9.V_CPU_IO #: CPU's I / O power supply, Southbridge need this power to the output interface signal processor.


10.SUSCLK: South Bridge RTC circuit generates hang clock used to refresh external clock chip as used. Often used in the IBM, SONY and other machines. In standby, when the clock to the motherboard EC / KBC (usually H8S) later, EC / KBC will enter a low-power mode, then jump into the H8S own shock wave state.


11.SYS_RESET # (system reset): This signal is input to Southbridge Southbridge and dried after debouncing will be forced to reset the internal logic of Southbridge, enabling the machine to reboot

How To Find Any Ip Address Of A Website Using Cmd


How To Find Any IP Address Of A Website Using CMD​


Hello all,
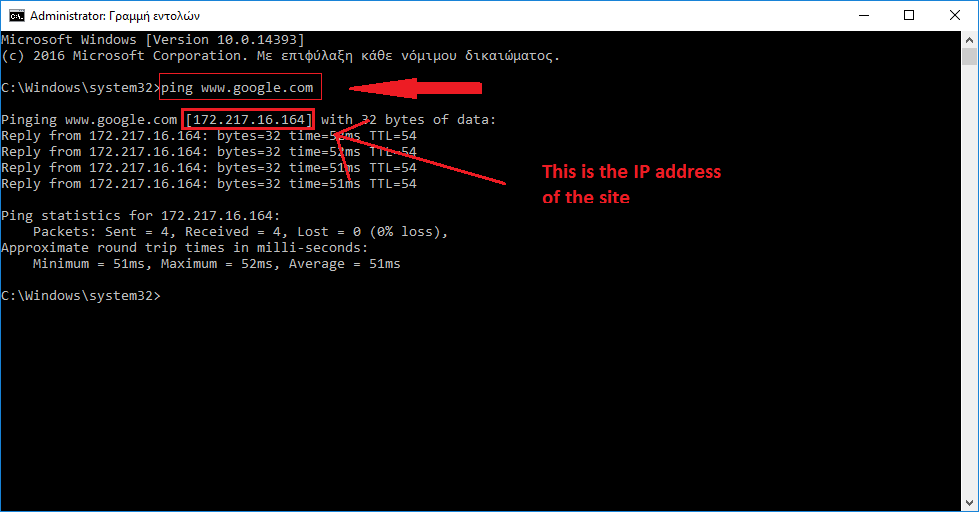
In this thread I will show you how to find the IP address of a website using CMD easily. So let's start!


1) First of all, open CMD and Run it as Admin (important)!
2) Then copy the URL from the site.
3) In CMD, write>> ping (and here you put the url of the site). And press enter. Here is an example:


How To Make Use Of Your Windows Key

Windows: Display the Start menu
Windows + D: Minimize or restore all windows
Windows + E: Display Windows Explorer
Windows + F: Display Search for files
Windows + Ctrl + F: Display Search for computer
Windows + F1: Display Help and Support Center
Windows + R: Display Run dialog box
Windows + break: Display System Properties dialog box
Windows + shift + M: Undo minimize all windows
Windows + L: Lock the workstation
Windows + U: Open Utility Manager
Windows + Q: Quick switching of users (Powertoys only)
Windows + Q: Hold Windows Key, then tap Q to scroll thru the different users on your PC

How Do You Know That Your Is Computer Is Infected ?

Unfortunately, there is no particular way to identify that your computer has been infected with malicious code. Some infections may completely destroy files and shut down your computer, while others may only subtly affect your computer’s normal operations. Be aware of any unusual or unexpected behaviors. If you are running anti-virus software, it may alert you that it has found malicious code on your computer. The anti-virus software may be able to clean the malicious code automatically, but if it can’t, you will need to take additional steps.

What can you do if you are infected?

Minimize the damage – If you are at work and have access to an IT department, contact them immediately. The sooner they can investigate and clean your computer, the less damage to your computer and other computers on the network. If you are on your home computer or a laptop, disconnect your computer from the internet. By removing the internet connection, you prevent an attacker or virus from being able to access your computer and perform tasks such as locating personal data, manipulating or deleting files, or using your computer to attack other computers.​
Remove the malicious code – If you have anti-virus software installed on your computer, update the virus definitions (if possible), and perform a manual scan of your entire system. If you do not have anti-virus software, you can purchase it at a local computer store . If the software can’t locate and remove the infection, you may need to reinstall your operating system, usually with a system restore disk that is often supplied with a new computer. Note that reinstalling or restoring the operating system typically erases all of your files and any additional software that you have installed on your computer. After reinstalling the operating system and any other software, install all of the appropriate patches to fix known vulnerabilities.​

How can you reduce the risk of another infection?

Dealing with the presence of malicious code on your computer can be a frustrating experience that can cost you time, money, and data. The following recommendations will build your defense against future infections:

use and maintain anti-virus software

– Anti-virus software recognizes and protects your computer against most known viruses. However, attackers are continually writing new viruses, so it is important to keep your anti-virus software current .

change your passwords

– Your original passwords may have been compromised during the infection, so you should change them. This includes passwords for web sites that may have been cached in your browser. Make the passwords difficult for attackers to guess .

keep software up to date

– Install software patches so that attackers can’t take advantage of known problems or vulnerabilities . Many operating systems offer automatic updates. If this option is available, you should enable it.

install or enable a firewall

– Firewalls may be able to prevent some types of infection by blocking malicious traffic before it can enter your computer . Some operating systems actually include a firewall, but you need to make sure it is enabled.

use anti-spyware tools

– Spyware is a common source of viruses, but you can minimize the number of infections by using a legitimate program that identifies and removes spyware .

follow good security practices – Take appropriate precautions when using email and web browsers so that you reduce the risk that your actions will trigger an infection .

How To Change Windows Default Installation Files Location

To Change The Default Drive Or Path Where Windows Look For It's Installation Files ,

Go To The Key ,regedit

:- HKEY_CURRENT_USER\Software\Microsoft\Windows\CurrentVersion\Policies\Explorer

In Right Panel , Create A New DWORD Value named NoSaveSetting and modify its value to 1. Refresh & Restart for The Setting To Get Saved.

Windows 10 Licensing & Changing Motherboards

Will changing your motherboard cause you to loose your free windows 10 upgrade? If your like me and wanted to know the answer to that question before you cash your current windows key in for a free windows 10 key then keep on reading.

The answer is that it really depends on the type of license that you had upgraded from.

When you upgrade a preinstalled (OEM) or retail version of Windows 7 or Windows 8/8.1 license to Windows 10, does that license remain OEM or become a retail license?

If you upgrade from an OEM or retail version of Windows 7 or Windows 8/8.1 to the free Windows 10 upgrade this summer, the license is consumed into it. Because the free upgrade is derived from the base-qualifying license, Windows 10 will carry that licensing too.

If you upgrade from a retail version, it carries the rights of a retail version.

If you upgrade from an OEM version, it carries the rights of an OEM version.

Full version (Retail):

- Includes transfer rights to another computer.

- Doesn't require a previous qualifying version of Windows.

- Expensive

Upgrade version (Retail):

- Includes transfer rights to another computer.

- Require a previous qualifying version of Windows.

- Expensive, but cheaper than full version

OEM:

OEM versions of Windows are identical to Full License Retail versions except for the following:

- OEM versions do not offer any free Microsoft direct support from Microsoft support personnel

- OEM licenses are tied to the very first computer you install and activate it on

- OEM versions allow all hardware upgrades except for an upgrade to a different model motherboard

- OEM versions cannot be used to directly upgrade from an older Windows operating system

What happens if I change my motherboard?

As it pertains to the OEM licenses this will invalidate the Windows 10 upgrade license because it will no longer have a previous base-qualifying license, which is required for the free upgrade. You will then have to purchase a full retail Windows 10 license. If the base-qualifying license (Windows 7 or Windows 8.1) was a full retail version, then yes, you can transfer it.

From the Windows 10 end user license agreement:

b. Stand-alone software. If you acquired the software as stand-alone software (and also if you upgraded from software you acquired as stand-alone software), you may transfer the software to another device that belongs to you. You may also transfer the software to a device owned by someone else if (i) you are the first licensed user of the software and (ii) the new user agrees to the terms of this agreement. You may use the backup copy we allow you to make or the media that the software came on to transfer the software. Every time you transfer the software to a new device, you must remove the software from the prior device. You may not transfer the software to share licenses between devices.


Summing it all up:

To sum it all up in my opinion, if your upgrading to Windows 10 using a retail version of either Home or Pro, chances are that when you change motherboards later on down the track due to it either being old or having died; you’ll retain your Windows 10 activation either without doing anything or by telling it to re activate assuming Microsoft doesn’t detect that you have just cloned your hard drive and have thrown it into another system while that original system is still being used. This being said I think you have to have your Free Windows 10 upgrade key tied to a Hotmail account. So those who sign in using there account and that used a Retail key to upgrade or do a fresh install to Windows 10 should not need worry about if there recent hardware failure or motherboard upgrade has cost them their Free copy of Windows 10.

For those who buy 10 it’ll be treated as a retail version so you can reinstall to new hardware over time, as you would like with Windows 7; using an online or phone system to activate windows once you have finished reinstalling. Again logging into your Hotmail account associated with that serial key may also automatically activate windows as it does with the newer versions of office.

I am curious to know that if people have upgraded to Windows 10 using their retail key is it possible for them to ever go back to there old version of windows if 10 is not for them, or is there key now rendered useless after migrating it to Windows 10?

How To Install A Wireless Printer In Your Home Network


#1


If you have a Home Network, like myself and many others, you surely need a printer installed. If you are planning to buy one soon, you should consider a wireless printer. Why? Lots of good reasons:

a) it allows you to print from anywhere in your home (any computer or smartphone)
b) it helps you eliminate one more wire
c) it allows you to place the printer in accessible places so that you are not bothered by others.

One thing to keep in mind though: installing and configuring a wireless printer requires a lot more work than installing a traditional printer. And this is where this guide comes in to assist you through all the important steps.

NOTE: Even though some of the installation steps can differ between printers, the principles covered in this guide remain the same for all wireless network printers. Let's get started.

1. Unpack the Printer

First, you need to unpack your printer and place it somewhere close enough to your wireless router so that it gets a good wireless signal. Also, the spot should be accessible to people using the printer.

Pay attention to the instructions from the printer’s manual regarding the removal of all packaging and protection. Printers tend to have really thorough, secure packaging filled with stickers, tape and other protection features.

2. Configure the Printer for the first time

Once all packaging is removed, it is time for you to install the printer and configure it for the first time. You need to plug in the power cord, install the cartridge(s) (depending on the manufacturer and model), and run the configuration wizard.

You might be asked to set the language used through the printer’s menus. Also, be sure to wait while the printer cleans and aligns the cartridges.

Before installing the printer on any of your computers, you need to connect it to your network. Look through its menus and search for LAN settings. You will surely have the option to connect it using a cable but also using wireless.

3. Select the wireless connection and go through your printer’s setup wizard. If you have security enabled on your router, you will be asked to select the network and enter the pass-code (security key). Once you enter all the details, the printer will start the connection procedure.

4. Unless you have a weird setup (e.g. old router, MAC filtering, etc.), the connection should be done in a few seconds.

5. If you encounter issues, check your printer’s manual for troubleshooting instructions and also look at your router’s configuration for any settings that could block your printer’s connection to the network.

NOTE: To double check that everything's fine, you can ask the printer to print its network configuration details. There you will see important details such as its MAC address, the IP address received from your router and other details.

6. Now you should install the printer on your computers. You should have not performed any installation/configuration steps on them until now.

NOTE: In order for your computers to view the printer over the network and use it for printing, you need to install the printer’s drivers and configure them on each computer that is part of your network.

The setup program can be found on a CD/DVD that comes with your printer or on the website of your printer’s manufacturer (search the drivers for your exact model and operating system). Since setup programs differ between manufacturers and printer models, I cannot provide you with a universal guide. Confidently use the manual that comes with your printer for detailed guidance. However, there are some universal pointers I would like to recommend you follow at all times:

IMPORTANT: DO NOT make an EASY installation - always go for a CUSTOM Install. EASY installations mean that you will get a lot of junk installed on your system - lots of software you don’t need, which will only slow down your computer.

7. When making a CUSTOM installation, choose the drivers plus the utilities you plan to use. Uncheck everything else to exclude it from your installation.

8. When asked about the printer connection method, don’t forget to select "Use the printer with wireless LAN connection".

9. The setup program should detect your printer. If it detects more than one (this could be your neighbors printer), select the one that matches the network connection

10. Once the setup is complete, the printer must show up in your Start Menu, under Devices and Printers.

NOTE: Don’t forget to run the setup program on ALL computers in your home network. Installing the printer on only one computer doesn't mean others will be able to work with it. Also, sharing the printer from a computer is no longer required. You simply need to install it separately on all computers and they can use it whenever needed, without depending on other computers to be turned on and sharing the printer.

CONCLUSION:

As you can see, installing a wireless network printer requires quite a bit of time and work. Also, you must be careful and not miss any steps or important configuration items. However, the time saved when using the wireless printer definitely pays off. Being able to print from anywhere in your home, at any time, really helps your productivity.

How To Right Click Using Keyboard


The right click is the action of pressing the right button on a mouse or touchpad. When you right click on an item in Windows, it will usually open a context menu, drop menu, or jump list for additional options for that item.

Haven't we all experienced the maddening frustrations when our Mouse isn't working properly?
I know I have at times, but there is a stress relieving, workable solution to this.

Sometimes it is necessary to use your keyboard for this function.

Here's a few possible, YET NOT ALL , mouse malfunctions:
a) Wireless Mouse has dead batteries; no cursor arrow present
b) Wireless USB connection may be loose; no cursor arrow present, erratic movement
c) Optical lense on bottom surface is dirty; cursor arrow jumpy and erratic movements
d) Moisture or other substance on fingers; cursor arrow off and on, jumpy, erratic movements

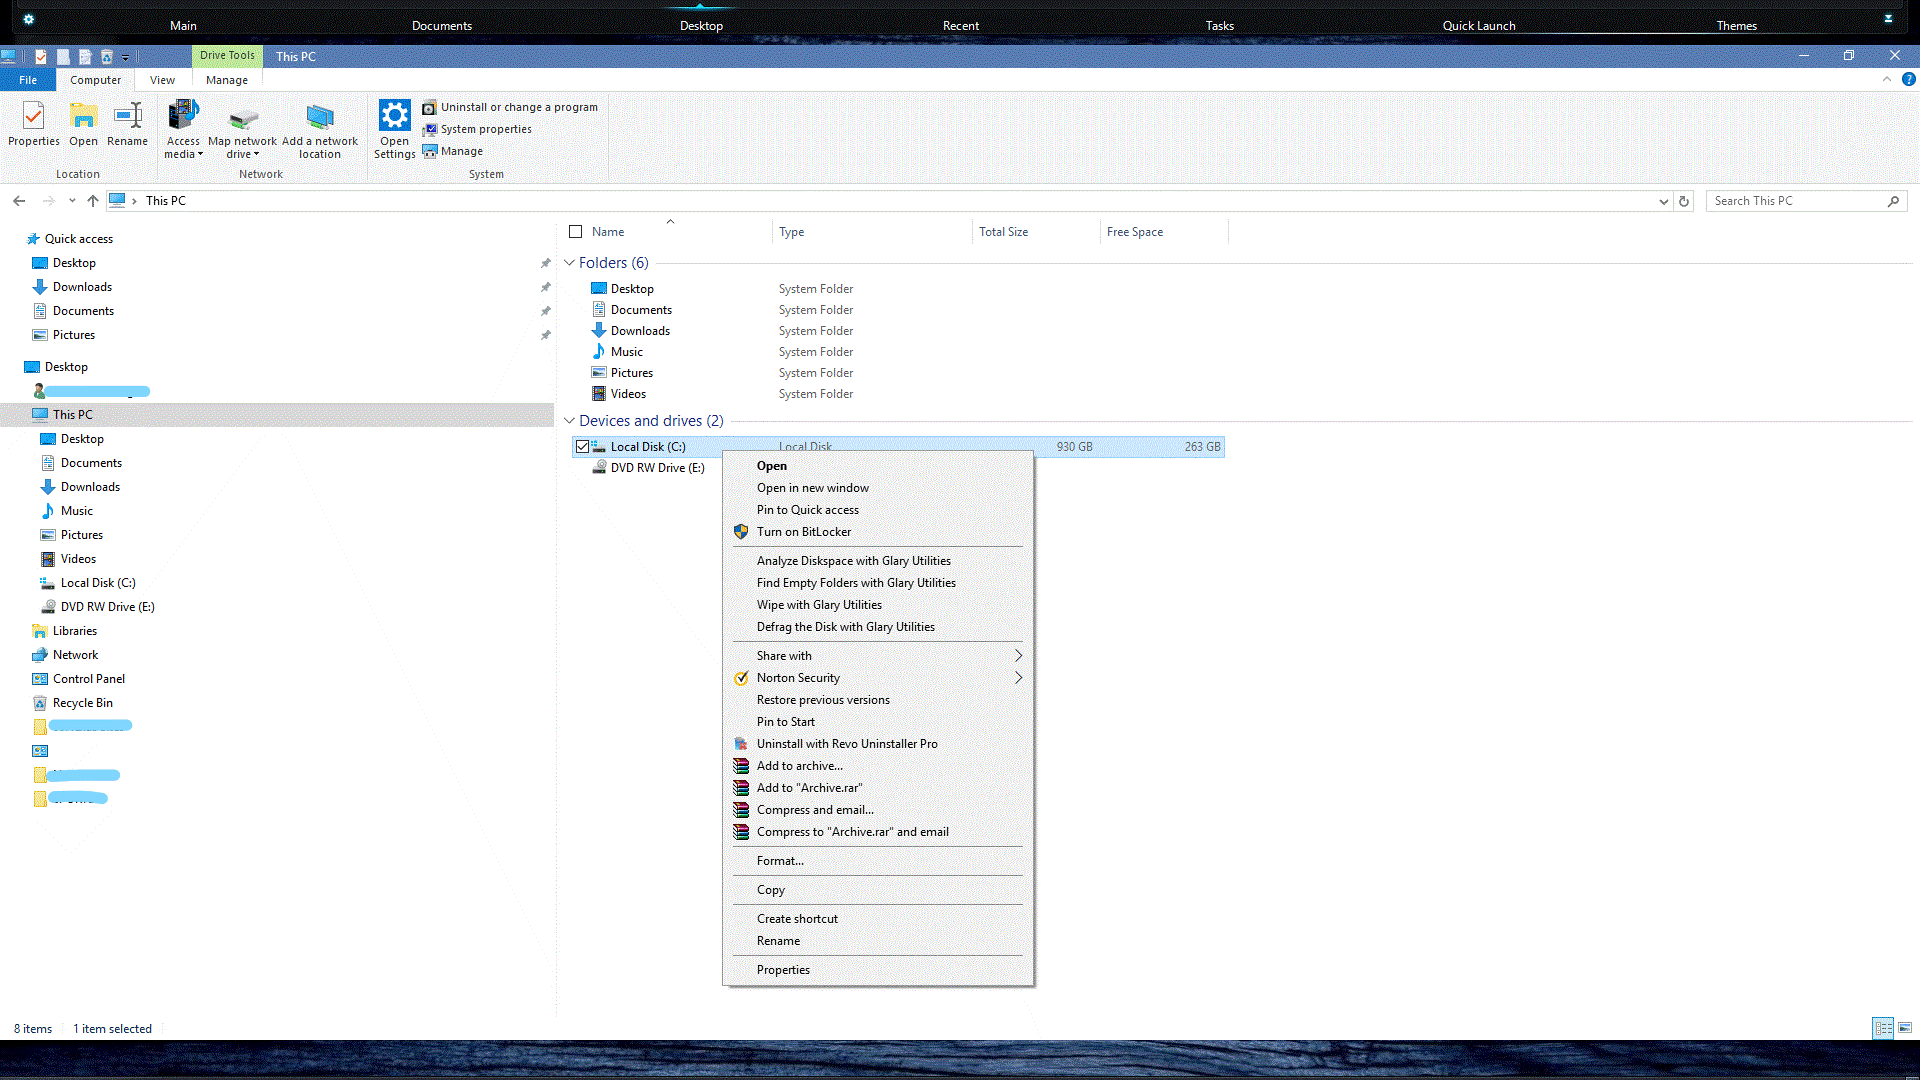
This Tip will show you how to right click on files, folders, and drives in File Explorer or on your Desktop using a keyboard in Windows 7, Windows 8, Windows 8.1 and Windows 10.


HERE'S HOW:

1. Pressing the Win + E on your keyboard to open File Explorer, select one or more items you want to right click on.

2. Press the Shift + F10 keys.

3. You can now perform one of the 3 actions below to select an item in the context menu.
(see screenshot below)

a) Look for the underlined letter in the context menu of the item you want to select, and press that letter on the keyboard.

b) Press the arrow keys to navigate to and highlight the item you want in the context menu, and press Enter to select it.

c) Click/tap on the item you want in the context menu.


That's it. Hopefully this won't be a long term solution for you until
you get your mouse back in operation. But it does come in handy when needed

Enable Or Disable Always Boot To Startup Settings


Advanced Startup Settings lets you start Windows 10 in different advanced troubleshooting modes to help you find and fix problems on your PC.
Normally, you could boot to Advanced Startup Options
to select to restart to Startup Settings.

If you like, you could set Windows 10 to always boot to Startup Settings first
then either press a number or function key (F1 thru F9)
to choose a boot option, or press Enter to continue booting to Windows 10.

This Tip will show you how to enable or disable
to always boot to Startup Settings on your Windows 10 PC.

NOTE: You must be signed in as an Administrator to be able to enable or disable to always boot to Startup Settings.


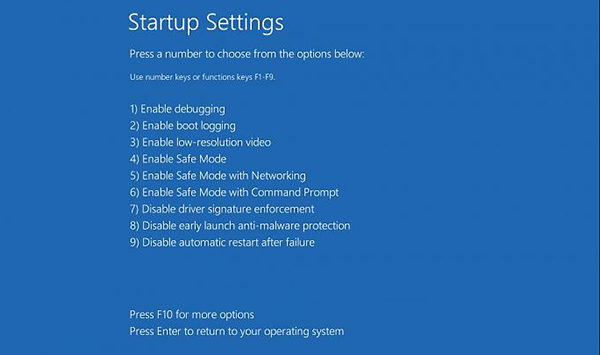
STARTUP SETTINGS / DESCRIPTION

Below is an explanation of what each individual selection
in the Startup Settings screen will be available for you to choose.

1) Enable debugging>>>Starts Windows in an advanced troubleshooting mode
intended for IT pros and system admins.

2) Enable boot logging>>>Creates a file, ntbtlog.txt, that lists all the drivers
that are installed during startup and that might be useful
for advanced troubleshooting.

3) Enable low-resolution video>>>Starts Windows using your current video driver
and using low resolution and refresh rate settings.
(You can use this mode to reset your display settings.)

4) Enable Safe Mode>>>Starts Windows with a minimal set of drivers and services.

5) Enable Safe Mode with Networking>>>Starts Windows in safe mode
and includes the network drivers and services needed to access the Internet
or other computers on your network.

6) Enable Safe Mode with Command Prompt>>>Starts Windows in safe mode
with a Command Prompt window instead of the usual Windows interface.
This option is intended for IT pros and system admins.

7) Disable driver signature enforcement>>>Allows drivers containing improper
(aka: unsigned) signatures to be installed.

8) Disable early launch anti-malware protection>>>Prevents the early launch
anti-malware driver from starting,
allowing drivers that might contain malware to be installed.

9) Disable automatic restart after failure>>>Prevents Windows from automatically restarting if an error causes Windows to fail.
Choose this option only if Windows is stuck in a loop where Windows fails, tries to restart,
and fails again repeatedly.


Here is a Picture of Startup Settings Screen in Windows 10


WARNING BEFORE PROCEEDING:
If after enabling, you let Startup Settings screen sit idle for 1 minute at boot, your PC will be automatically turned off.


Here's How To Enable / Disable Startup Settings Screen

1. Open an Elevated Command Prompt** (see instructions below) in Windows 10

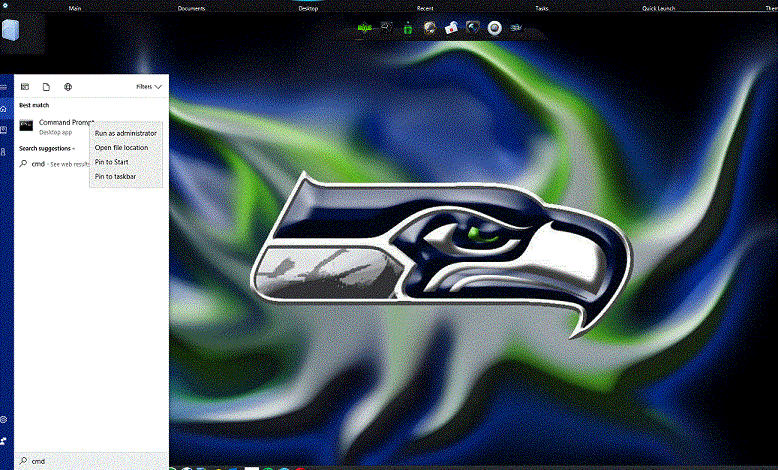
Simple Option On How To Open Elevated Command Prompt using Taskbar Search

a) Using Taskbar Search, type cmd in search box
b) When Command Prompt shows up in results, right click with your mouse, then click/tap on Run as Administrator


(I know, there are many more ways to do this, but I just wanted to show off my desktop wallpaper)

2. Do step 3 (enable) or step 4 (disable) below for what you want.

3. To Enable Always Boot to Startup Settings

a) Type the command below in the command prompt, and press Enter. (recommend you copy it then paste it to prevent errors)

bcdedit /set {globalsettings} advancedoptions true


b) After entering command, exit screen and reboot your PC. This will then bring you to the Startup Settings screen.

NOTE: With the Startup Settings screen being enabled, you may experience a slower boot time while the Startup Settings screen is loaded. This is normal.

4. To Disable Always Boot to Startup Settings

NOTE: This is the initial default setting

a) Type the command below in the command prompt, and press Enter. (recommend you copy it then paste it to prevent errors)

bcdedit /set {globalsettings} advancedoptions false


b) After entering command, exit screen and reboot your PC.

All Finished.

I use this setting with the PC's in my home for its convenience when I'm troubleshooting any of my family's computer systems.

Download Amazon E-books For Free!

1. Go to this site http://gen.lib.rus.ec
2. Enter the eBook name you want.
3. Download the eBook and enjoy!

How To Speeding Your Surfing Speed And Unblock Blocked Sites Even Your Isp Blocked It


One of the best way of speeding your surfing speed is by using public DNS (domain name server)

When u connect to internet you are most probably using the DNS provided by your ISP (internet
service provider) and you can change it by going to...

Step 1
=======

Control Panel > Network and Sharing Center > And then click on
CHANGE ADAPTER SETTINGS

Step 2
=======

Right click on the connection you want to configure to use the google public dns system, click on
"Properties" then click on the Networking tab.

Step 3
=======

And then select the "INTERNET PROTOCOL VERSION 4" option and click on the "PROPERTIES" button
and under the "GENERAL" tab, select the option USE THE FOLLOWING DNS SERVER ADDRESSES And then enter google DNS server addresses

Preferred DNS server 8.8.8.8
Alternate DNS server 8.8.4.4


Nd it's up......reconnect to the
Internet and Enjoy....


Tested in my PC 100% working.

Screenshot Method
Step 1


Step 2


Step 3


Step 4


Step 5


Android Codes

Usefull Keybord Shortcuts For All


CTRL+C (Copy)
CTRL+X (Cut)
CTRL+V (Paste)
CTRL+Z (Undo)
Delete (Delete)
Shift+Delete (Delete the selected item permanently without placing the item in the Recycle Bin)
CTRL while dragging an item (Copy the selected item)
CTRL+Shift while dragging an item (Create a shortcut to the selected item)
F2 key (Rename the selected item)
CTRL+RIGHT ARROW (Move the insertion point to the beginning of the next word)
CTRL+LEFT ARROW (Move the insertion point to the beginning of the previous word)
CTRL+DOWN ARROW (Move the insertion point to the beginning of the next paragraph)
CTRL+UP ARROW (Move the insertion point to the beginning of the previous paragraph)
CTRL+Shift with any of the arrow keys (Highlight a block of text)
Shift with any of the arrow keys (Select more than one item in a window or on the desktop, or select text in a document)
CTRL+A (Select all)
F3 key (Search for a file or a folder)
Alt+Enter (View the properties for the selected item)
Alt+F4 (Close the active item, or quit the active program)
Alt+Enter (Display the properties of the selected object)
Alt+Spacebar (Open the shortcut menu for the active window)
CTRL+F4 (Close the active document in programs that enable you to have multiple documents open simultaneously)
Alt+Tab (Switch between the open items)
Alt+ESC (Cycle through items in the order that they had been opened)
F6 key (Cycle through the screen elements in a window or on the desktop)
F4 key (Display the Address bar list in My Computer or Windows Explorer)
Shift+F10 (Display the shortcut menu for the selected item)
Alt+Spacebar (Display the System menu for the active window)
CTRL+ESC (Display the Start menu)
Alt+Underlined letter in a menu name (Display the corresponding menu)
Underlined letter in a command name on an open menu (Perform the corresponding command)
F10 key (Activate the menu bar in the active program)
RIGHT ARROW (Open the next menu to the right, or open a submenu)
LEFT ARROW (Open the next menu to the left, or close a submenu)
F5 key (Update the active window)
Backspace (View the folder one level up in My Computer or Windows Explorer)
ESC (Cancel the current task)
Shift when you insert a CD-ROM into the CD-ROM drive (Prevent the CD-ROM from automatically playing)

Dialog Box Keyboard Shortcuts
CTRL+Tab (Move forward through the tabs)
CTRL+Shift+Tab (Move backward through the tabs)
Tab (Move forward through the options)
Shift+Tab (Move backward through the options)
Alt+Underlined letter (Perform the corresponding command or select the corresponding option)
Enter (Perform the command for the active option or button)
Spacebar (Select or clear the check box if the active option is a check box)
Arrow keys (Select a button if the active option is a group of option buttons)
F1 key (Display Help)
F4 key (Display the items in the active list)
Backspace (Open a folder one level up if a folder is selected in the Save As or Open dialog box)

Microsoft Natural Keyboard Shortcuts
Win (Display or hide the Start menu)
Win+BREAK (Display the System Properties dialog box)
Win+D (Display the desktop)
Win+M (Minimize all of the windows)
Win+Shift+M (Restore the minimized windows)
Win+E (Open My Computer)
Win+F (Search for a file or a folder)
CTRL+Win+F (Search for computers)
Win+F1 (Display Windows Help)
Win+ L (Lock the keyboard)
Win+R (Open the Run dialog box)
Win+U (Open Utility Manager)

Accessibility Keyboard Shortcuts
Right Shift for eight seconds (Switch FilterKeys either on or off)
Left Alt+left Shift+PRINT SCREEN (Switch High Contrast either on or off)
Left Alt+left Shift+NUM LOCK (Switch the MouseKeys either on or off)
Shift five times (Switch the StickyKeys either on or off)
NUM LOCK for five seconds (Switch the ToggleKeys either on or off)
Win +U (Open Utility Manager)

Windows Explorer Keyboard Shortcuts
END (Display the bottom of the active window)
HOME (Display the top of the active window)
NUM LOCK+* (Display all of the subfolders that are under the selected folder)
NUM LOCK++ (Display the contents of the selected folder)
NUM LOCK+- (Collapse the selected folder)
LEFT ARROW (Collapse the current selection if it is expanded, or select the parent folder)
RIGHT ARROW (Display the current selection if it is collapsed, or select the first subfolder)

Shortcut Keys for Character Map
After you double-click a character on the grid of characters, you can move through the grid by using the keyboard shortcuts:
RIGHT ARROW (Move to the right or to the beginning of the next line)
LEFT ARROW (Move to the left or to the end of the previous line)
UP ARROW (Move up one row)
DOWN ARROW (Move down one row)
PAGE UP (Move up one screen at a time)
PAGE DOWN (Move down one screen at a time)
HOME (Move to the beginning of the line)
END (Move to the end of the line)
CTRL+HOME (Move to the first character)
CTRL+END (Move to the last character)
Spacebar (Switch between Enlarged and Nor mal mode when a character is selected)

Microsoft Management Console (MMC) Main Window Keyboard Shortcuts
CTRL+O (Open a saved console)
CTRL+N (Open a new console)
CTRL+S (Save the open console)
CTRL+M (Add or remove a console item)
CTRL+W (Close window/tab)
F5 key (Update the content of all console windows)
Alt+Spacebar (Display the MMC window menu)
Alt+F4 (Close the console)
Alt+A (Display the Action menu)
Alt+V (Display the View menu)
Alt+F (Display the File menu)
Alt+O (Display the Favorites menu)

MMC Console Window Keyboard Shortcuts
CTRL+P (Print the current page or active pane)
Alt+- (Display the window menu for the active console window)
Shift+F10 (Display the Action shortcut menu for the selected item)
F1 key (Open the Help topic, if any, for the selected item)
F5 key (Update the content of all console windows)
CTRL+F10 (Maximize the active console window)
CTRL+F5 (Restore the active console window)
Alt+Enter (Display the Properties dialog box, if any, for the selected item)
F2 key (Rename the selected item)
CTRL+F4 (Close the active console window. When a console has only one console window, this shortcut closes the console)

Remote Desktop Connection Navigation
CTRL+Alt+END (Open the m*cro$oft Windows NT Security dialog box)
Alt+PAGE UP (Switch between programs from left to right)
Alt+PAGE DOWN (Switch between programs from right to left)
Alt+INSERT (Cycle through the programs in most recently used order)
Alt+HOME (Display the Start menu)
CTRL+Alt+BREAK (Switch the client computer between a window and a full screen)
Alt+Delete (Display the Windows menu)
CTRL+Alt+- (Place a snapshot of the active window in the client on the Terminal server clipboard and provide the same functionality as pressing PRINT SCREEN on a local computer.)
CTRL+Alt++ (Place a snapshot of the entire client window area on the Terminal server clipboard and provide the same functionality as pressing Alt+PRINT SCREEN on a local computer.)

Internet Explorer navigation
CTRL+B (Open the Organize Favorites dialog box)
CTRL+E (Open the Search bar)
CTRL+F (Start the Find utility)
CTRL+H (Open the History bar)
CTRL+I (Open the Favorites bar)
CTRL+L (Open the Open dialog box)
CTRL+N (Start another instance of the browser with the same Web address)
CTRL+O (Open the Open dialog box, the same as CTRL+L)
CTRL+P (Open the Print dialog box)
CTRL+R (Update the current Web page)
CTRL+W (Close the current window)

A To Z Index Of The Windows Command Line


#1


a
ADDUSERS Add or list users to/from a CSV file
ARP Address Resolution Protocol
ASSOC Change file extension associations•
ASSOCIAT One step file association
ATTRIB Change file attributes
b
BOOTCFG Edit Windows boot settings
BROWSTAT Get domain, browser and PDC info
c
CACLS Change file permissions
CALL Call one batch program from another•
CD Change Directory - move to a specific Folder•
CHANGE Change Terminal Server Session properties
CHKDSK Check Disk - check and repair disk problems
CHKNTFS Check the NTFS file system
CHOICE Accept keyboard input to a batch file
CIPHER Encrypt or Decrypt files/folders
CleanMgr Automated cleanup of Temp files, recycle bin
CLEARMEM Clear memory leaks
CLIP Copy STDIN to the Windows clipboard.
CLS Clear the screen•
CLUSTER Windows Clustering
CMD Start a new CMD shell
COLOR Change colors of the CMD window•
COMP Compare the contents of two files or sets of files
COMPACT Compress files or folders on an NTFS partition
COMPRESS Compress individual files on an NTFS partition
CON2PRT Connect or disconnect a Printer
CONVERT Convert a FAT drive to NTFS.
COPY Copy one or more files to another location•
CSCcmd Client-side caching (Offline Files)
CSVDE Import or Export Active Directory data
d
DATE Display or set the date•
DEFRAG Defragment hard drive
DEL Delete one or more files•
DELPROF Delete NT user profiles
DELTREE Delete a folder and all subfolders
DevCon Device Manager Command Line Utility
DIR Display a list of files and folders•
DIRUSE Display disk usage
DISKCOMP Compare the contents of two floppy disks
DISKCOPY Copy the contents of one floppy disk to another
DISKPART Disk Administration
DNSSTAT DNS Statistics
DOSKEY Edit command line, recall commands, and create macros
DSACLs Active Directory ACLs
DSAdd Add items to active directory (user group computer)
DSGet View items in active directory (user group computer)
DSQuery Search for items in active directory (user group computer)
DSMod Modify items in active directory (user group computer)
DSMove Move an Active directory Object
DSRM Remove items from Active Directory
e
ECHO Display message on screen•
ENDLOCAL End localisation of environment changes in a batch file•
ERASE Delete one or more files•
EVENTCREATE Add a message to the Windows event log
EXIT Quit the current script/routine and set an errorlevel•
EXPAND Uncompress files
EXTRACT Uncompress CAB files
f
FC Compare two files
FIND Search for a text string in a file
FINDSTR Search for strings in files
FOR /F Loop command: against a set of files•
FOR /F Loop command: against the results of another command•
FOR Loop command: all options Files, Directory, List•
FORFILES Batch process multiple files
FORMAT Format a disk
FREEDISK Check free disk space (in bytes)
FSUTIL File and Volume utilities
FTP File Transfer Protocol
FTYPE Display or modify file types used in file extension associations•
g
GLOBAL Display membership of global groups
GOTO Direct a batch program to jump to a labelled line•
GPUPDATE Update Group Policy settings
h
HELP Online Help
i
iCACLS Change file and folder permissions
IF Conditionally perform a command•
IFMEMBER Is the current user in an NT Workgroup
IPCONFIG Configure IP
k
KILL Remove a program from memory
l
LABEL Edit a disk label
LOCAL Display membership of local groups
LOGEVENT Write text to the NT event viewer
LOGOFF Log a user off
LOGTIME Log the date and time in a file
m
MAPISEND Send email from the command line
MBSAcli Baseline Security Analyzer.
MEM Display memory usage
MD Create new folders•
MKLINK Create a symbolic link (linkd)
MODE Configure a system device
MORE Display output, one screen at a time
MOUNTVOL Manage a volume mount point
MOVE Move files from one folder to another•
MOVEUSER Move a user from one domain to another
MSG Send a message
MSIEXEC Microsoft Windows Installer
MSINFO Windows NT diagnostics
MSTSC Terminal Server Connection (Remote Desktop Protocol)
MUNGE Find and Replace text within file(s)
MV Copy in-use files
n
NET Manage network resources
NETDOM Domain Manager
NETSH Configure Network Interfaces, Windows Firewall & Remote access
NETSVC Command-line Service Controller
NBTSTAT Display networking statistics (NetBIOS over TCP/IP)
NETSTAT Display networking statistics (TCP/IP)
NOW Display the current Date and Time
NSLOOKUP Name server lookup
NTBACKUP Backup folders to tape
NTRIGHTS Edit user account rights
o
OPENFILES Query or display open files
p
PATH Display or set a search path for executable files•
PATHPING Trace route plus network latency and packet loss
PAUSE Suspend processing of a batch file and display a message•
PERMS Show permissions for a user
PERFMON Performance Monitor
PING Test a network connection
POPD Restore the previous value of the current directory saved by PUSHD•
PORTQRY Display the status of ports and services
POWERCFG Configure power settings
PRINT Print a text file
PRNCNFG Display, configure or rename a printer
PRNMNGR Add, delete, list printers set the default printer
PROMPT Change the command prompt•
PsExec Execute process remotely
PsFile Show files opened remotely
PsGetSid Display the SID of a computer or a user
PsInfo List information about a system
PsKill Kill processes by name or process ID
PsList List detailed information about processes
PsLoggedOn Who's logged on (locally or via resource sharing)
PsLogList Event log records
PsPasswd Change account password
PsService View and control services
PsShutdown Shutdown or reboot a computer
PsSuspend Suspend processes
PUSHD Save and then change the current directory•
q
QGREP Search file(s) for lines that match a given pattern.
r
RASDIAL Manage RAS connections
RASPHONE Manage RAS connections
RECOVER Recover a damaged file from a defective disk.
REG Registry: Read, Set, Export, Delete keys and values
REGEDIT Import or export registry settings
REGSVR32 Register or unregister a DLL
REGINI Change Registry Permissions
REM Record comments (remarks) in a batch file•
REN Rename a file or files•
REPLACE Replace or update one file with another
RD Delete folder(s)•
RMTSHARE Share a folder or a printer
ROBOCOPY Robust File and Folder Copy
ROUTE Manipulate network routing tables
RUNAS Execute a program under a different user account
RUNDLL32 Run a DLL command (add/remove print connections)
s
SC Service Control
SCHTASKS Schedule a command to run at a specific time
SCLIST Display NT Services
SET Display, set, or remove environment variables•
SETLOCAL Control the visibility of environment variables•
SETX Set environment variables permanently
SFC System File Checker
SHARE List or edit a file share or print share
SHIFT Shift the position of replaceable parameters in a batch file•
SHORTCUT Create a windows shortcut (.LNK file)
SHOWGRPS List the NT Workgroups a user has joined
SHOWMBRS List the Users who are members of a Workgroup
SHUTDOWN Shutdown the computer
SLEEP Wait for x seconds
SLMGR Software Licensing Management (Vista/2008)
SOON Schedule a command to run in the near future
SORT Sort input
START Start a program or command in a separate window•
SU Switch User
SUBINACL Edit file and folder Permissions, Ownership and Domain
SUBST Associate a path with a drive letter
SYSTEMINFO List system configuration
t
TASKLIST List running applications and services
TASKKILL Remove a running process from memory
TIME Display or set the system time•
TIMEOUT Delay processing of a batch file
TITLE Set the window title for a CMD.EXE session•
TLIST Task list with full path
TOUCH Change file timestamps
TRACERT Trace route to a remote host
TREE Graphical display of folder structure
TYPE Display the contents of a text file•
u
USRSTAT List domain usernames and last login
v
VER Display version information•
VERIFY Verify that files have been saved•
VOL Display a disk label•
w
WHERE Locate and display files in a directory tree
WHOAMI Output the current UserName and domain
WINDIFF Compare the contents of two files or sets of files
WINMSD Windows system diagnostics
WINMSDP Windows system diagnostics II
WMIC WMI Commands
x
XCACLS Change file and folder permissions
XCOPY Copy files and folders

How To Boot To Uefi Settings Using A Shortcut In Windows 10


HOW TO BOOT TO UEFI SETTINGS USING A SHORTCUT IN WINDOWS 10

General
Most computers have a specific key which when pressed when computer is started lets user to access UEFI (Firmware) settings.
On laptop I'm using to write this, it's the ESC key. However, I quite often press the key too late missing the given time-frame,
as this laptop by default only waits only a few seconds before booting to Windows. I find it extremely frustrating and looked for an easier way.

Another option to boot to UEFI settings is to restart to Advanced Startup options and go from there.

This just wasn't making it any easier it for me, so I found something that takes away quite a bunch of my frustration.

This Tip will show a third not well known, but IMO, an extremely practical way to restart directly to UEFI settings using a shortcut.

NOTICE that the shortcut will NOT work on:

1.) BIOS based (Legacy) machines
2.) UEFI machines where entering firmware settings is DISABLED like in for instance on some rental computers
3.) Hyper-V virtual machines and so on.


How to Boot to UEFI Settings Using A Shortcut in Windows 10

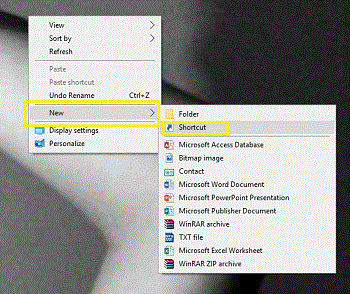
1.) Right click on an empty spot on Desktop, select New > Shortcut:


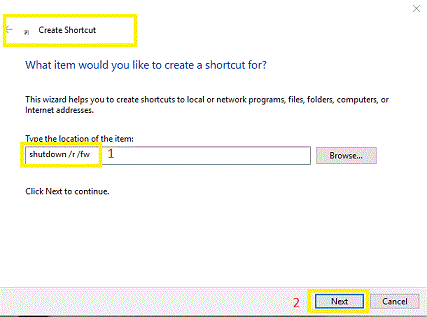
2.) Enter the following command and click Next:


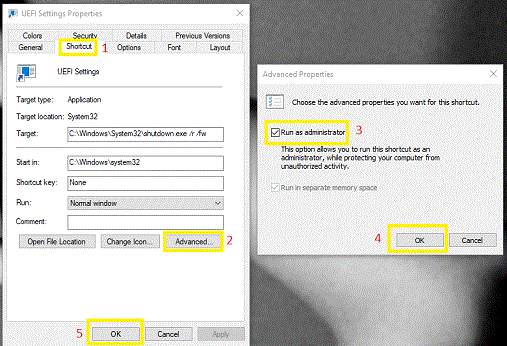
shutdown /r /fw


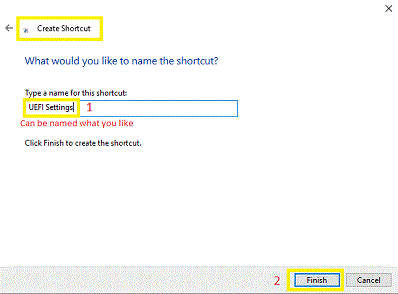
3.) Name the shortcut as you wish, click Finish:


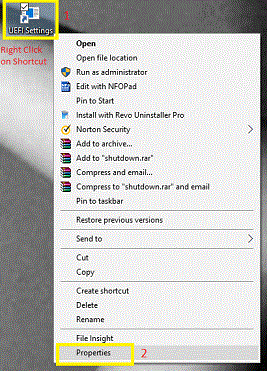
4.) Right click the new shortcut and select Properties:


5.) In Shortcut tab, select Advanced, select Run as administrator, click OK to close Advanced Properties, click OK to save changed Properties:

NOTE:
Usually the shutdown command does not require elevated (Run as Administrator) privileges.
However, using the /fw switch (fw = firmware) to boot to UEFI settings is an exception;
whenever /fw is used with shutdown command, it needs to be elevated. That is why we must elevate the shortcut.


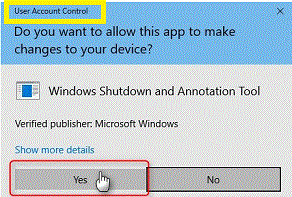
6.) You can now restart your PC entering UEFI settings simply by double clicking the shortcut. As it is elevated, a UAC prompt will be shown. Click Yes:


7.) You will get a notification about Windows signing you out. Click Close, close all possibly open applications and let your PC restart to UEFI settings:


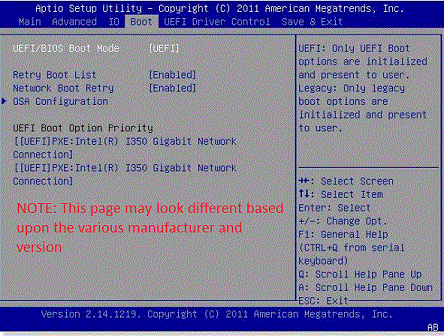
8.) Your PC will now restart directly to UEFI settings
(below a sample screen-shot, actual settings page might be different based on actual UEFI manufacturer and version):


NOTE: Have patience when activating this shortcut. There can be up to a 30 second delay for this action. This is NORMAL.

NOTE: If your UEFI settings have been disabled and set to (Legacy) BIOS on your UEFI capable PC, enabling UEFI settings on your computer will make this shortcut available to you.

Hope this helps save some of you like it did for me from the ever persistent finger mashing, and the often confusing and forgetful question: "what key do I press?" during start-up.

100 Useful Run Commands For Windows

1. Windows Version – winver
2. Windows System Security Tool – syskey
3. Windows Firewall - firewall.cpl
4. Add/Remove Programs - appwiz.cpl
5. Administrative Tools - control admintools
6. Automatic Updates - wuaucpl.cpl
7. Bluetooth Transfer Wizard - fsquirt
8. Calculator - calc
9. Certificate Manager - certmgr.msc
10. Character Map - charmap
11. Check Disk Utility - chkdsk
12. Clipboard Viewer - clipbrd
13. Command Prompt - cmd
14. Component Services - dcomcnfg
15. Computer Management - compmgmt.msc
16. Control Panel - control
17. Date and Time Properties - timedate.cpl
18. DDE Shares - ddeshare
19. Device Manager - devmgmt.msc
20. Direct X Troubleshooter - dxdiag
21. Disk Cleanup Utility - cleanmgr
22. Disk Defragment - dfrg.msc
23. Disk Management - diskmgmt.msc
24. Disk Partition Manager - diskpart
25. Display Properties - control desktop
26. Display Properties - desk.cpl
27. Dr. Watson System Troubleshooting Utility - drwtsn32
28. Driver Verifier Utility - verifier
29. Event Viewer - eventvwr.msc
30. Files and Settings Transfer Tool - migwiz
31. File Signature Verification Tool - sigverif
32. Findfast - findfast.cpl
33. Firefox - firefox
34. Folders Properties - control folders
35. Fonts - control fonts
36. Fonts Folder - fonts
37. Free Cell Card Game - freecell
38. Game Controllers - joy.cpl
39. Group Policy Editor (for xp professional) - gpedit.msc
40. Hearts Card Game - mshearts
41. Help and Support - helpctr
42. HyperTerminal - hypertrm
43. Iexpress Wizard - iexpress
44. Indexing Service - ciadv.msc
45. Internet Connection Wizard - icwconn1
46. Internet Explorer - iexplore
47. Internet Properties - inetcpl.cpl
48. Keyboard Properties - control keyboard
49. Local Security Settings - secpol.msc
50. Local Users and Groups - lusrmgr.msc
51. Logs You Out Of Windows - logoff
52. Malicious Software Removal Tool - mrt
53. Microsoft Chat - winchat
54. Microsoft Movie Maker - moviemk
55. Microsoft Paint - mspaint
56. Microsoft Syncronization Tool - mobsync
57. Minesweeper Game - winmine
58. Mouse Properties - control mouse
59. Mouse Properties - main.cpl
60. Netmeeting - conf
61. Network Connections - control netconnections
62. Network Connections - ncpa.cpl
63. Network Setup Wizard - netsetup.cpl
64. Notepad - notepad
65. Object Packager - packager
66. ODBC Data Source Administrator - odbccp32.cpl
67. On Screen Keyboard - osk
68. ******* Express - msimn
69. Paint - pbrush
70. Password Properties - password.cpl
71. Performance Monitor - perfmon.msc
72. Performance Monitor - perfmon
73. Phone and Modem Options - telephon.cpl
74. Phone Dialer - dialer
75. Pinball Game - pinball
76. Power Configuration - powercfg.cpl
77. Printers and Faxes - control printers
78. Printers Folder - printers
79. Regional Settings - intl.cpl
80. Registry Editor - regedit
81. Registry Editor - regedit32
82. Remote Access Phonebook - rasphone
83. Remote Desktop - mstsc
84. Removable Storage - ntmsmgr.msc
85. Removable Storage Operator Requests - ntmsoprq.msc
86. Resultant Set of Policy (for xp professional) - rsop.msc
87. Scanners and Cameras - sticpl.cpl
88. Scheduled Tasks - control schedtasks
89. Security Center - wscui.cpl
90. Services - services.msc
91. Shared Folders - fsmgmt.msc
92. Shuts Down Windows - shutdown
93. Sounds and Audio - mmsys.cpl
94. Spider Solitare Card Game - spider
95. SQL Client Configuration - cliconfg
96. System Configuration Editor - sysedit
97. System Configuration Utility - msconfig
98. System Information - msinfo32
99. System Properties - sysdm.cpl
100. Windows Explorer - explorer

Increase internet speed by 20% Without Any Software


Microsoft reserves 20% of your available bandwidth for their own purposes like
Windows Updates and interrogating your PC etc.
By unreserving this bandwidth, you can make your internet connection faster.
By 20%. The steps to be followed are:

1. Click Start then Run and type "gpedit.msc" without quotes.

2. Then go to Local Computer Policy>Computer Configuration>Administrative Templetes>Network>QoS Packet Scheduler. Click on QoS Packet Scheduler. In the right side , find Limit Reservable Bandwidth and double click on Limit Reservable Bandwidth.

3. It will say it is not configured but the truth is under the ‘Explain’ tab. Select ‘Enable’ and set reservable bandwidth to zero.

4. Click on ‘Apply’ and your internet speed will boost up by 20%.

Steps :-