
LAPTOP CHIPLEVEL.CHIPLEVEL MOTHERBOARD,,LED/LCD TV .LED/LCD MONITOR.REPAIR.MEMORY.GRAPHICS.PRINTER.LAPTOP.HARD DISK.REPAIRING TIPS.CIRCUIT EXPLANATION.SERVICE TIPS.WORKING PRINCIPLES.TUTORIALS.SCHEMATIC,BIOS Contact 9633034123
Thursday, October 31, 2019
Thursday, October 17, 2019
How To Enable Or Disable Reserved Storage In Windows 10
Enable or disable Reserved Storage in Windows 10
Starting with Windows 10 version 1903, there is a new feature called Reserved Storage. As the name suggests, Reserved Storage is nothing but a certain amount of disk space set aside by Windows 10 for Windows Updates, apps, temporary files, and system caches.
The idea behind Reserved Storage is to always have some disk space for Windows Update, temporary files, system caches, and apps. As you likely know, Windows operating system and other apps might not work as expected when the disk is full. By enabling the reserved storage, you can make sure that Windows 10 will always
The amount of storage reserved starts at about 7 GB and the same varies over time based on how you use your Windows 10 computer. As you can see in the picture below, on my PC, reserved storage is using just 2.5 GB of disk space.
Step 1: Open the Registry Editor by keying in Regedit in Start/taskbar search field and then hitting the Enter key.
Step 2: Navigate to the following registry key:
HKEY_LOCAL_MACHINE\SOFTWARE\Microsoft\Windows\CurrentVersion\ReserveManager
TIP: Simply copy and paste the above registry path in the Registry Editor’s address bar and then press the Enter key to quickly navigate to the key.
Step 3: On the right-side, look for ShippedWithReserves and double-click on it to open its properties.
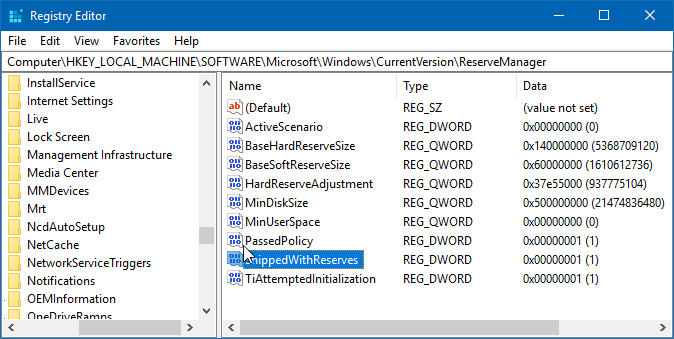
Step 4: Set the value data to 0 to disable the Reserved Storage. Setting the value data to 1 will enable the Reserved Storage in Windows 10.
Disable Windows 10 updates by creating a group policy
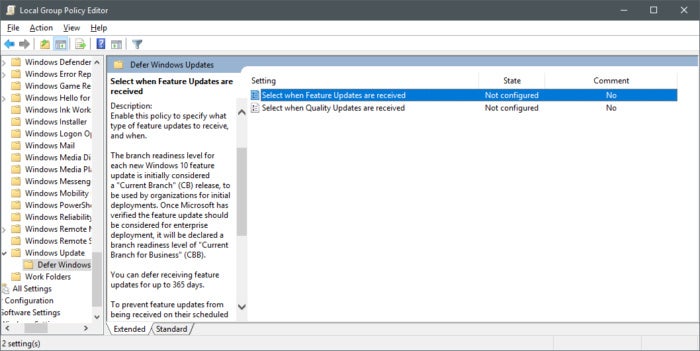
Press Win-R, type gpedit.msc, press Enter. This brings up the Local Group Policy Editor.
Navigate the left pane as if it were File Explorer to
Computer Configuration > Administrative Templates > Windows Components > Windows Update > Defer Updates.
Choose Select when Feature Updates are received.
IDG
Group Policy editor in Windows 10 1703.
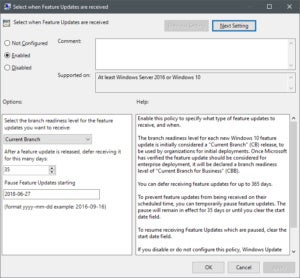
In the resulting dialog box, select Enabled.
In the Options box, type in how many days you'd like to pause updates and then in the next field type in today's date.
Click Apply and then OK
IDG
Pausing feature updates in Windows 10.
If you want to you can repeat this process for the second setting in Group Policy named Select when Quality Updates are received. Keep in mind, however, that quality updates include security updates and skipping them is not the best idea. On the upside, security updates are cumulative meaning if you do skip these updates, you can download the next one and be up to date.
Microsoft doesn't like it when people pause updates, and even using Group Policy you can pause updates for only about 30-35 days, depending on the version of Windows 10 you're using.[ Further reading: The best free software for your PC ]
The metered network trick
If you’ve got the plain old Home version of Windows 10, you can stop some automatic updates by lying to your operating system. (Morally speaking, this doesn’t bother us a bit.)
In older versions of Windows 10 this only works with a Wi-Fi network, but in version 1703 and later ethernet connections can take part as well.
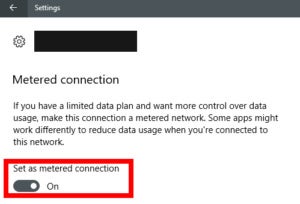
The trick is to tell Windows that you have a metered connection to the Internet—one that can only download so many bits per month without increasing your ISP bill. Microsoft says doing this means "some updates for Windows won't be installed automatically" and some apps may not work as expected.
IDG
Setting a metered connection in Windows 10.
To tell Windows that you have a metered connection (whether you do or not):
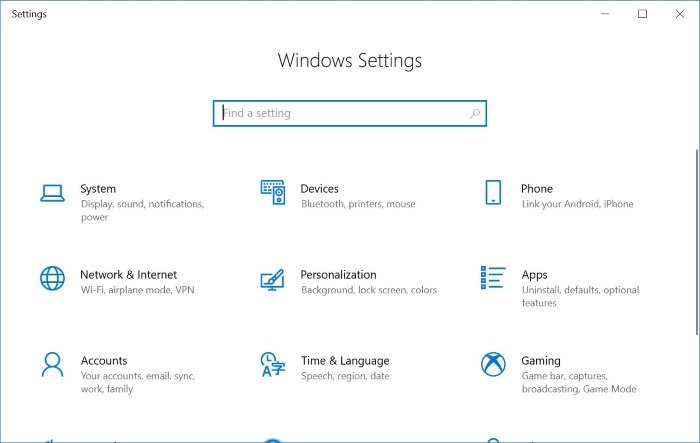
Select Start > Settings > Network & Internet.
Select the Wi-Fi or Ethernet tab in the left pane depending on the connection type you want to change.
In the main pane, select the name of your connection.
On the next screen turn on Metered connection
How To Enable Or Disable Settings & Control Panel In Windows 10
Most Windows 10 PC users would never need to block or disable the Settings app and the classic Control Panel. You can always create a standard user account when you need to let others use your PC for some reason.
However, on certain occasions, you might want to disable or block both Settings app and Control Panel in Windows 10. For instance, when you don’t want to create another user account but would like to prevent s/he using your PC from making changes to your customized or default settings.
Windows 10 doesn’t offer an easy way to disable Control Panel and Settings. You need to enable or disable Settings and Control Panel either through Group Policy or Windows Registry.
Follow the given below directions to enable or disable Settings and Control Panel in Windows 10.
Method 1 of 2
Turn on or off Settings & Control Panel via Group Policy
Note that Group Policy Editor is not part of Windows 10 Home edition, meaning you cannot use Group Policy to enable or disable Settings and Control Panel in Home edition. Please use the Method 2 of this guide (Registry method) to enable or disable Settings and Control Panel via Windows Registry.
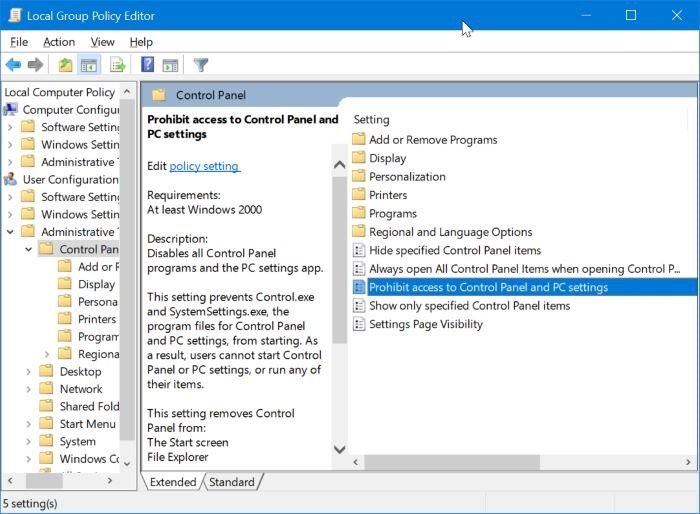
Step 1: Open the Local Group Policy Editor by typing its name in the Start/taskbar search field and then hitting the Enter key.
Step 2: In the Local Group Policy Editor window, navigate to User Configuration > Administrative Templates > Control Panel. On the right-side, look for Prohibit access to Control Panel and PC Settings policy, and then double-click on it to open its properties.
Step 3: Select the Enabled option to disable or block both the Settings and Control Panel. Click on the Apply button.
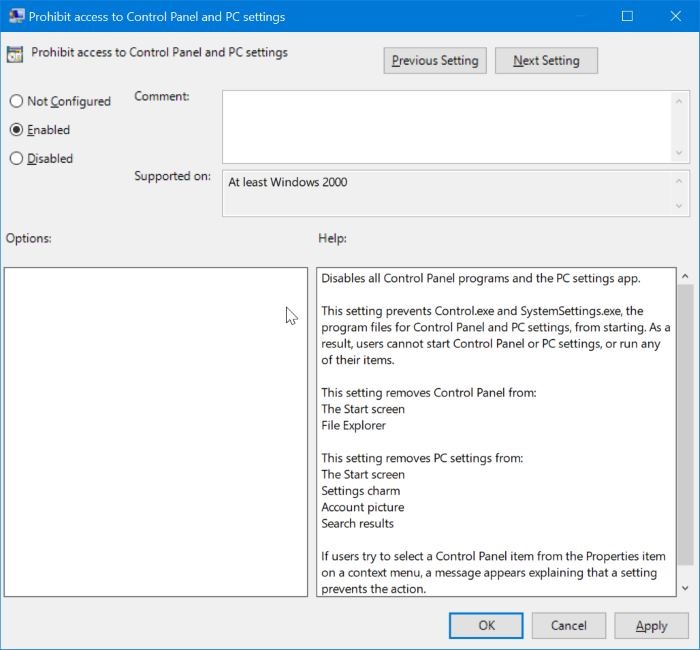
o re-enable Settings and Control Panel, select Not Configured. Click the Apply button.
Method 2 of 2
Enable or disable Settings and Control Panel via Registry
Step 1: Type Regedit in the Start/taskbar search field and then hit Enter key.
Click Yes button if you get the User Account Prompt.
Step 2: Navigate to the following key:
HKEY_CURRENT_USER\Software\Microsoft\ Windows\CurrentVersion\Policies\Explorer
Step 3: On the right-side, right-click on an empty spot, click New, click DWORD (32-bit) Value, and then name it as NoControlPanel.
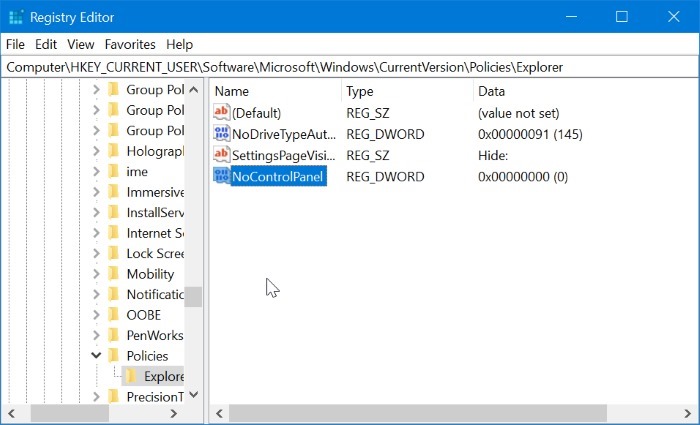
Step 4: Finally, double-click on the NoControlPanel value and then set its value data to 1 to disable or block both the Control Panel and Settings.
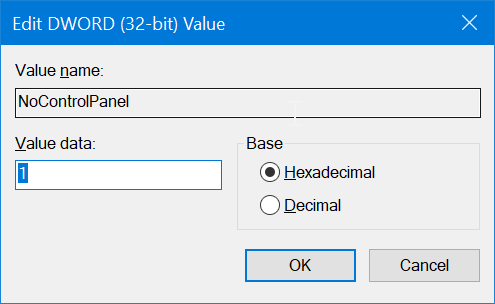
Set the value to 0 or delete NoControlPanel value to enable both Control Panel and Settings app in Windows 10.
How To Enable Or Disable User Accounts In Windows 10
Windows 10, like earlier versions of Windows, supports creating multiple user accounts. You can either create local user accounts as well Microsoft accounts to sign in to Windows 10.
Many of us have created more than one user accounts to let others also use our PCs. For instance, you might have created another user account to let your family use your PC.

If you have more than one user accounts on your PC, at times, you might want to disable or block a user account on your PC to restrict a user from accessing his/her account or stop a user from using your PC.
While you can always delete a user account to remove that account permanently, you might want to block or disable an account for a short period. For instance, you might want to block or disable your kid’s user account during exams to stop playing games on PC.
Windows 10 has a provision to disable or block user accounts. You can either block a Microsoft account or a local user account. You must be the administrator to block or disable a user account.
When the user tries to sign-in to a blocked account, he will get “Your account has been disabled. Please see your system administrator” message if it’s a local user account. If it’s a Microsoft account, the user will get wrong password error even if he/she is entering the correct password.
Follow the step-by-step directions given below to block or disable a user account in Windows 10.
Method 1 of 2
Enable or disable a user account in Windows 10 Pro
Note: This method applies to Windows 10 Pro and above editions only. If you are on Home edition, please refer to the directions in Method 2.
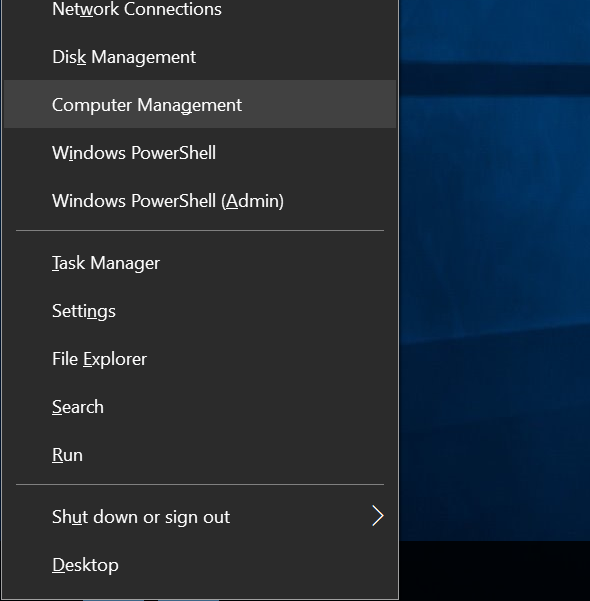
Step 1: Right-click on the Start button on the taskbar and then click Computer Management to open the same.
Step 2: On the left-pane of Computer Management, expand Local Users and Groups folder. Now click Users folder.
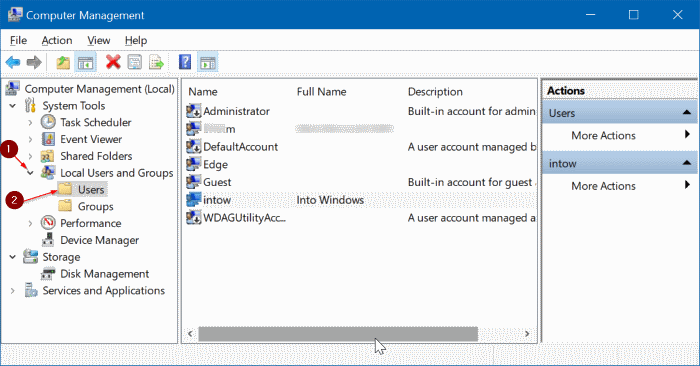
Step 3: Now, on the right-side, you will see all local and Microsoft accounts on your PC.
Step 4: Right-click on the user account that you want to block or disable, and then click Properties.
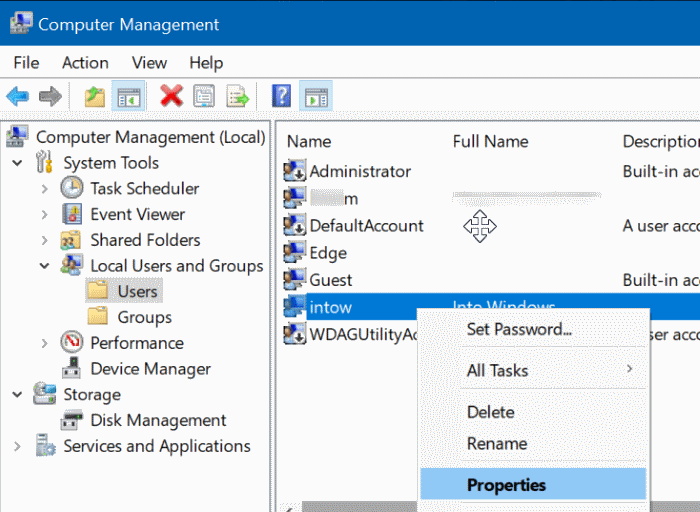
Remember that you cannot disable or block the user account that you are currently logged-in. Also, you must have admin rights to disable or block a user account.
Step 5: In the Properties dialog, under the General tab, check Account is disabled option. Finally, click Apply button to disable or block the account.
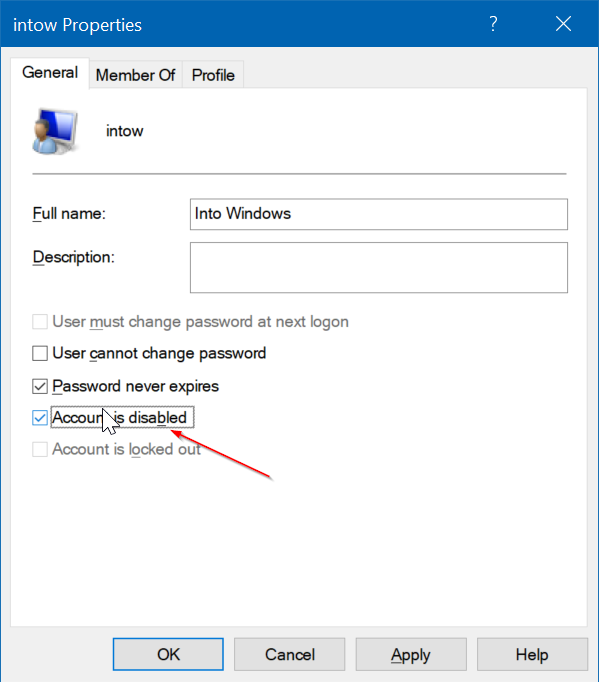
To enable a blocked or disabled user account in Windows 10
Follow the directions mentioned in the above guide and then uncheck the Account is disabled option. Click Apply button. That’s it!
Method 2 of 2
Enable or disable user account in Windows 10 Home
Windows 10 Home users can use Command Prompt to enable or disable a user account.
Step 1: Open Command Prompt as administrator.
Step 2: In the elevated Command Prompt, execute the following command to enable or disable a user account.
net user accountname /active:no
In the above command replace “accountname” with the actual name of the user account.

To enable the user account, use the following command:
net user accountname /active:yes
Again, replace “accountname” with the user account name.
How to disable Microsoft Edge
Have you ever used a cookie cleaner and been told you need to close Edge? Maybe you had to force it close so that a cookie cleaner could proceed to wipe internet tracks that don't exist because you don't even use Edge. Perhaps you have tried to remove it and have witnessed the build becoming unstable? Or maybe you've killed the process somehow in task manager or a firewall and after updating Windows found it running in the background yet again. Well I'm going to show you how to safely disable Edge.
Open Task Manager.
Click "More details" at the bottom of the Task Manager window, click on it to show more details.
Look for "Microsoft Edge". If you find it in the list, right click on it and select "End task".
Note: If you did not find it running in the background that doesn't mean it doesn't run in the background, only that it wasn't running currently. Continue to the next step.
Go to the folder "C:\Windows\SystemApps\Microsoft.MicrosoftEdge_8wekyb3d8bbwe" and rename that folder to anything you wish. (It's nice append some text to it like "_remove" so I can easily re-enable Edge in the future if I desire.)
Edge should now be "disabled". Try using it if you want to confirm.
Microsoft to my knowledge can revert the folder back to the original file name and thus re-enabling Edge during the anniversary update, but just repeat the above steps.
Note:
If you PC doesn't allow you to change the name of the folder you don't have administrator privileges. Take ownership of the folder or right click on MicrosoftEdge file then Properties / Security / Advanced / click change (next to owner) and change to your username, then click Ok. After that click Edit, then add your username and give full permissions.
How To Clean Unused Drivers
Do you frequently update drivers? Does your build have Windows update enabled. Perhaps it has been a few months since you've done a clean install, or maybe you have a small SSD for your operating system and are looking to save some space. Well I'm going to show you how to remove drivers your system currently isn't using. First to find out just how much space your drivers are taking up go to:
C:\Windows\System32\drivers
and especially
C:\Windows\System32\DRIVERSTORE
Note the size of these folders, anything more than a couple gigs and you've probably got the opportunity to save some space. It's not that uncommon for DRIVERSTORE to be upwards of 10 gigs! Now you can use the in-house Microsoft utility called disk cleanup, but that still can leave you with a bunch of bloat left over. What can happen is devices like printers, cameras, monitors, headphones, your mouse and phone can update drivers through Windows update; and soon you're drivers are consuming lots of precious SSD space. To permanently clean unused drivers first it's a good idea to backup your system with whatever backup software you use. To continue open up Notepad, and copy then paste the following code:
@echo off
for /L %%A in (1,1,300) do (
echo Deleting OEM%%A.INF
pnputil /d OEM%%A.INF
)
Save wherever. Call the file whatever.bat and save the file as All Files not .txt. I save to my desktop and name the file .bat
Right click and run the file as an administrator, and then recheck the aforementioned folders to see how much space you've recovered!
How to Clean the WinSxS Folder
C:\Windows\WinSxS
is huge and will continue to get bigger the more updates have been installed on your system. If you're using a build that updates read on. The WinSxS folder contains old versions and system components. This folder also contains files for uninstalled and or disabled Windows components. Component files elsewhere in Windows are links to files contained in the WinSxS folder. The WinSxS folder contains every operating system file, meaning any updates will increase the size of this folder. What this large folder does is allow you to uninstall updates which can be useful in the case of a bad update, however this feature is sparingly used. First visit the folder:
C:\Windows\WinSxS
If you're using Windows 10 and your folder is clean it should be around 7 gig. Programs like Windows 10 Manager and AusLogics BoostSpeed will clean this folder for you but there are others. Windows Disk Cleanup will do a average job but the easiest way to do it by yourself is in command prompt. To clean the folder it's a good idea to backup your system but it's not required. Note the size of the folder first, then open up an admin command prompt. Copy and paste the following command:
Dism.exe /online /Cleanup-Image /StartComponentCleanup
(hit enter of course)
After the above command runs use this next command (Note: be patient a large folder take time to clean!)
Dism.exe /online /Cleanup-Image /StartComponentCleanup /ResetBase
And then finally the third and final command
Dism.exe /online /Cleanup-Image /SPSuperseded
Note the size of the folder again and see how much space you saved
Tuesday, October 8, 2019
How to Disable Windows 10 updates by creating a group policy
Open the "Run" window again (you can press the "Windows" + R key to make it more comfortable) and type "gpedit.msc".
Display the left menu until you reach “Computer configuration -> Administrative templates -> Windows components -> Windows Update” and right click on “Edit” in “Configure automatic updates”.
A new editing window will open in which you just have to check the "Disabled" option and apply the changes.
Restart the PC and goodbye to automatic updates
How To Enable "God Mode"
Are you an advanced Windows 10 user who wants access to all your PC's processes? "God mode" can be a great solution. To enable "God Mode" right click on the desktop
> New > Folder. re-name the new folder exactly:
GodMode.{ED7BA470-8E54-465E-825C-99712043E01C}
To easily enter into the "God Mode" window, double-click the folder and enjoy!
> New > Folder. re-name the new folder exactly:
GodMode.{ED7BA470-8E54-465E-825C-99712043E01C}
To easily enter into the "God Mode" window, double-click the folder and enjoy!
Windows 10 editions
Windows 10 Pro and Windows 10 Enterprise offer an array of powerful features for business needs, all wrapped in a secure package.
Windows 10 Pro for Workstations
For advanced performance.
Windows 10 Pro
A solid foundation for every business.
Windows 10 Enterprise
For organizations with advanced security and management needs.
Intelligent security
Advanced security, powered by cloud intelligence, that proactively protects your business.
How To Use Rufus To Download Windows 10 ISO
While the official Media Creation Tool is quite good, it doesn’t prepare the bootable USB as fast as the popular Rufus software. Rufus is fast, sports an easy-to-understand interface, available in many languages, and updated very often. It even supports preparing Windows To Go USB drive.
Good news is that you no longer need to use the Media Creation Tool or any other software to download Windows 10 ISO as Rufus can now do that.
Rufus can download Windows 10 ISO from Microsoft servers and prepare the bootable USB.
Using Rufus to download Windows 10 ISO
Here is how to use Rufus to download Windows 10 and then prepare a bootable USB.
Step 1: Connect an 8GB+ USB drive which you would like to make a bootable USB.
Step 2: Download and run Rufus 3.5 or later version. In addition to the regular installer, a portable version of Rufus is also available for users who don’t want to install the program.
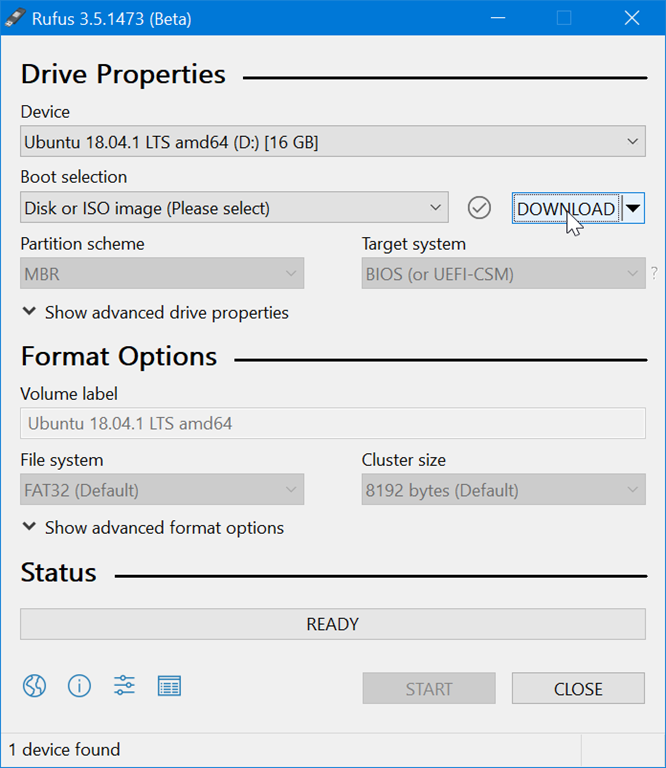
Step 3: In the Device drop-down box, select your USB drive. Select Disk or ISO image from the Boot selection drop down box, click the small down arrow next to the Select button and then be sure to select the Download option.
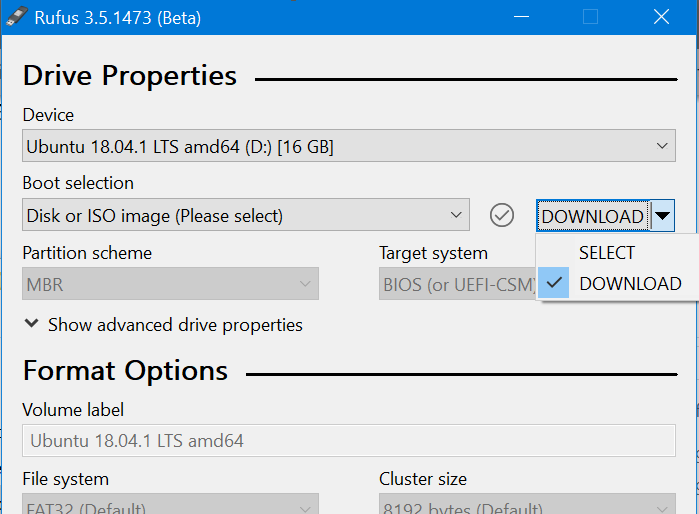
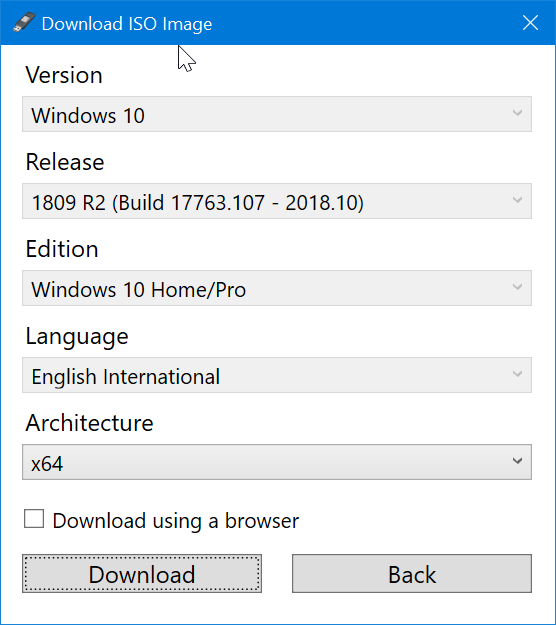
Step 4: Now, click the Download button to download the Figo script which once downloaded will display the following dialog where you need to select Windows 10 (or Windows 8.1 if you wish to download it) and then click OK button to see a list of Windows 10 versions.
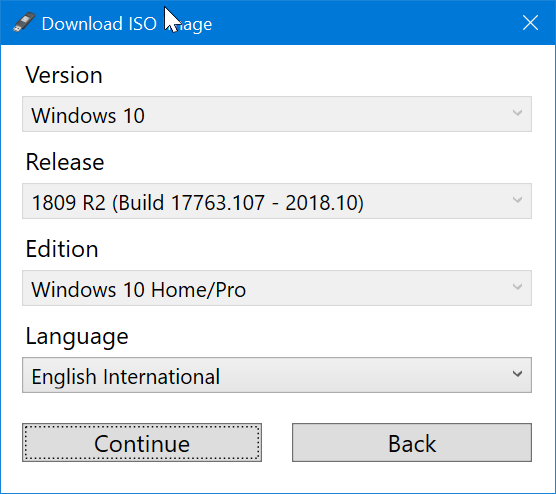
Select the latest version of Windows 10, click the OK button again, select the edition of Windows 10 (Home, Pro or Education), click the Continue button, select the language, click Continue again, and then select the architecture (32-bit or 64-bit).

Step 5: Finally, click the Download button, select a location to save the ISO file and then click the Save button to begin downloading the Windows 10 ISO file. If you would like to use a web browser to download the ISO, you can do so by selecting Download using browser option.
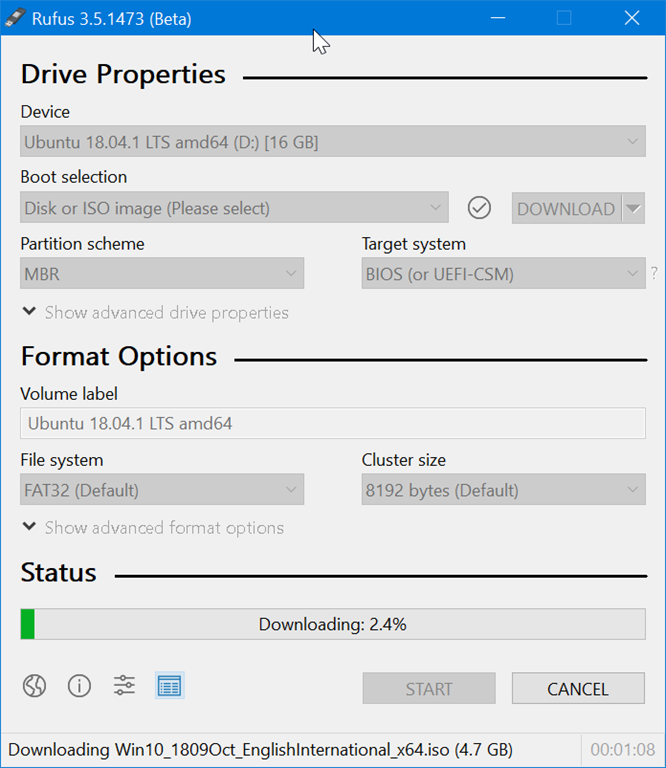
Step 6: Once the ISO is downloaded, click the START button to format the connected USB drive and make it as bootable USB.
Collection of Best FREE VPNs
UltraVPN
PacketiX.Internet
Hotspot Shield
Loki Network Project
ProXPN
Securitykiss Tunnel
Free US VPN- PPTP VPN based service
Expatshield
LogMeIn Hamachi
how to disable windows 10 updates ??
1 policy editor gpedit.msc and open the following section:
Computer Configuration -> Administrative Templates -> Windows Components -> Windows
Computer Configuration -> Administrative Templates -> Windows Components -> Windows
UpdateFurther, all settings are indicated here, we need to set three parameters:
Specify intranet Microsoft update service locationWe set the status to Enabled, the address of the update service and statistics server we write localhost. With this setting, we tell the system to look for updates not on the Internet, but on the local computer, where they are not.
Do not connect to any Windows Update Internet locationsThe state is set to Enabled. With this setting, we prohibit receiving information from the publicly available Windows Update service.
Configure Automatic Updates
The state is set to Disabled. This item is optional, it only disables automatic periodic checks for updates.
So you can enable or disable automatic updating of Windows 10 as needed without additional programs.
2 use third-party software called "Ultimate Windows Tweaker 4.3"
Subscribe to:
Posts (Atom)