Search This Blog

Tuesday, April 21, 2020

Recover original Windows 10 license from BIOS/UEFI [Tip]


1) Method 1 CMD

a) Press

b) Write CMD

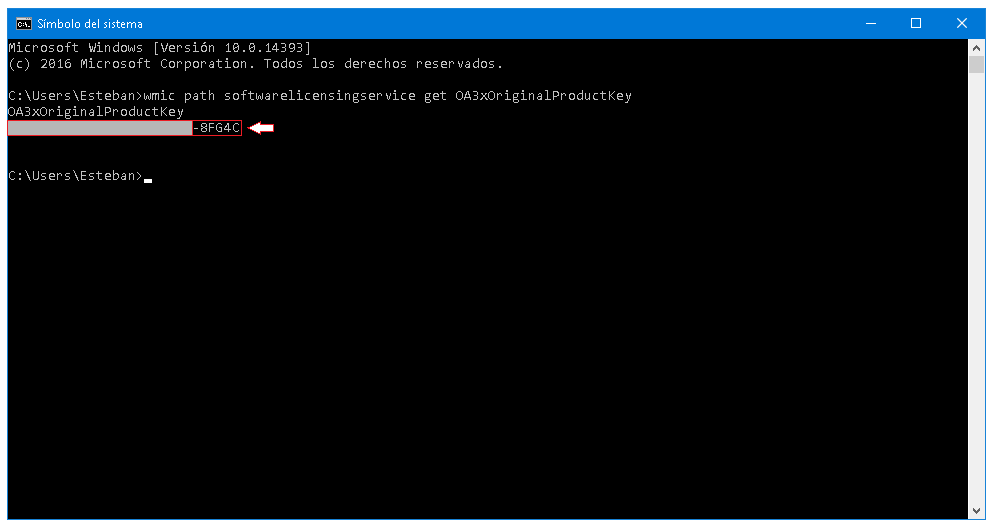
c) In the CMD console paste the following command and press Enter:
Code:
WMIC Path SoftwareLicensingService Get OA3xOriginalProductKey


2) Method 2 POWERSHELL

a) Search in Programs and Files: Windows Powershell and open the console.

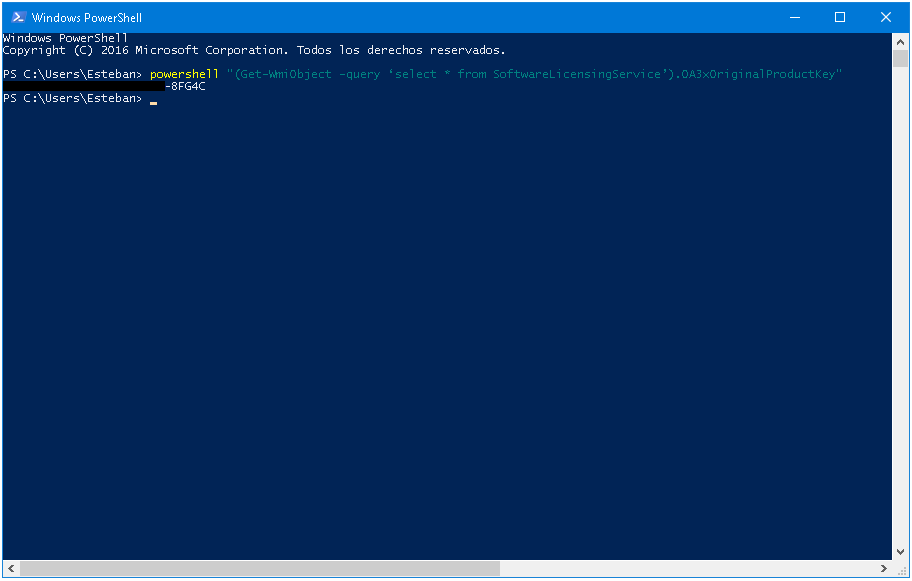
b) In the Powershell console paste the following command and press Enter:
Code:
powershell "(Get-WmiObject -query ‘select * from SoftwareLicensingService’).OA3xOriginalProductKey"


As we can see in the screenshots, these commands access the original key that is preinstalled on our computer, so if we are having activation problems, we can use that code to activate our Windows 10 and complete the validation process. original copy.

NOTE: This works for new machines purchased with the original factory pre-installed Windows 10.

How to disable Microsoft Edge

Have you ever used a cookie cleaner and been told you need to close Edge? Maybe you had to force it close so that a cookie cleaner could proceed to wipe internet tracks that don't exist because you don't even use Edge. Perhaps you have tried to remove it and have witnessed the build becoming unstable? Or maybe you've killed the process somehow in task manager or a firewall and after updating Windows found it running in the background yet again. Well I'm going to show you how to safely disable Edge.

Open Task Manager.

Click "More details" at the bottom of the Task Manager window, click on it to show more details.

Look for "Microsoft Edge". If you find it in the list, right click on it and select "End task".
Note: If you did not find it running in the background that doesn't mean it doesn't run in the background, only that it wasn't running currently. Continue to the next step.

Go to the folder "C:\Windows\SystemApps\Microsoft.MicrosoftEdge_8wekyb3d8bbwe" and rename that folder to anything you wish. (It's nice append some text to it like "_remove" so I can easily re-enable Edge in the future if I desire.)Edge should now be "disabled". Try using it if you want to confirm.

Microsoft to my knowledge can revert the folder back to the original file name and thus re-enabling Edge during the anniversary update, but just repeat the above steps.

Note:

If you PC doesn't allow you to change the name of the folder you don't have administrator privileges. Take ownership of the folder or right click on MicrosoftEdge file then Properties / Security / Advanced / click change (next to owner) and change to your username, then click Ok. After that click Edit, then add your username and give full permissions.

How to Disable Automatic Driver Downloads on Windows 10


How to Disable Automatic Driver Downloads on Windows 10

Buried deep within the old Control Panel, Windows 10 still has the option to avoid installing drivers as part of Windows Updates. For most of us, the drivers are a welcome addition to keep things running smoothly, but the tinkerers out there like things a certain way, and updating a driver might change previously stored settings.

In addition, many times our PC works correctly with its original drivers from the manufacturer and Windows installs others that make the machine not work properly.


1. Right click the Start button and select Control Panel.


2. Make your way to System and Security.


3. Click System.


4. Click Advanced system settings from the left sidebar.


5. Select the Hardware tab.


6. Press the Device Installation Settings button.


7. Choose No, and then press the Save Changes button.


How to view hidden USB files caused by viruses and remove malware


How to view hidden USB files caused by viruses and remove them, without installing any program or AV.


1. Go to start and then go to run, or in this case press on the keyboard, the start button (the one with the microsoft windows logo) and then press it along with the R key.
2. In this box they write CMD
3. Now the console will open, in this first they write the letter of the drive of their USB and colon (e: f: g: h: i:, etc) press Enter key
4. Digitize:

Code:
attrib /s /d -r -h -s *.*


5. Now press the Enter key, now go to Windows Explorer, and you will see the files that were previously hidden, what this command does is show absolutely all the .exe .doc .rar files, etc. as well as subfolders

Delete all suspicious files (*), mainly those with these extensions: .exe, .inf, .lnk, .scr, .dll, for example:

Code:
del autorun.inf del *.exe del *.inf del *.lnk del *.scr del *.dll


Delete the folders and files shown in the images. (*)
In order to delete the "system volume information" folder, use this command in CMD:

Code:
rmdir "system volume information" /s /q


(*) Deleting these files and folders removes the virus

100 Useful Run Commands For Windows

1. Windows Version – winver
2. Windows System Security Tool – syskey
3. Windows Firewall - firewall.cpl
4. Add/Remove Programs - appwiz.cpl
5. Administrative Tools - control admintools
6. Automatic Updates - wuaucpl.cpl
7. Bluetooth Transfer Wizard - fsquirt
8. Calculator - calc
9. Certificate Manager - certmgr.msc
10. Character Map - charmap
11. Check Disk Utility - chkdsk
12. Clipboard Viewer - clipbrd
13. Command Prompt - cmd
14. Component Services - dcomcnfg
15. Computer Management - compmgmt.msc
16. Control Panel - control
17. Date and Time Properties - timedate.cpl
18. DDE Shares - ddeshare
19. Device Manager - devmgmt.msc
20. Direct X Troubleshooter - dxdiag
21. Disk Cleanup Utility - cleanmgr
22. Disk Defragment - dfrg.msc
23. Disk Management - diskmgmt.msc
24. Disk Partition Manager - diskpart
25. Display Properties - control desktop
26. Display Properties - desk.cpl
27. Dr. Watson System Troubleshooting Utility - drwtsn32
28. Driver Verifier Utility - verifier
29. Event Viewer - eventvwr.msc
30. Files and Settings Transfer Tool - migwiz
31. File Signature Verification Tool - sigverif
32. Findfast - findfast.cpl
33. Firefox - firefox
34. Folders Properties - control folders
35. Fonts - control fonts
36. Fonts Folder - fonts
37. Free Cell Card Game - freecell
38. Game Controllers - joy.cpl
39. Group Policy Editor (for xp professional) - gpedit.msc
40. Hearts Card Game - mshearts
41. Help and Support - helpctr
42. HyperTerminal - hypertrm
43. Iexpress Wizard - iexpress
44. Indexing Service - ciadv.msc
45. Internet Connection Wizard - icwconn1
46. Internet Explorer - iexplore
47. Internet Properties - inetcpl.cpl
48. Keyboard Properties - control keyboard
49. Local Security Settings - secpol.msc
50. Local Users and Groups - lusrmgr.msc
51. Logs You Out Of Windows - logoff
52. Malicious Software Removal Tool - mrt
53. Microsoft Chat - winchat
54. Microsoft Movie Maker - moviemk
55. Microsoft Paint - mspaint
56. Microsoft Syncronization Tool - mobsync
57. Minesweeper Game - winmine
58. Mouse Properties - control mouse
59. Mouse Properties - main.cpl
60. Netmeeting - conf
61. Network Connections - control netconnections
62. Network Connections - ncpa.cpl
63. Network Setup Wizard - netsetup.cpl
64. Notepad - notepad
65. Object Packager - packager
66. ODBC Data Source Administrator - odbccp32.cpl
67. On Screen Keyboard - osk
68. ******* Express - msimn
69. Paint - pbrush
70. Password Properties - password.cpl
71. Performance Monitor - perfmon.msc
72. Performance Monitor - perfmon
73. Phone and Modem Options - telephon.cpl
74. Phone Dialer - dialer
75. Pinball Game - pinball
76. Power Configuration - powercfg.cpl
77. Printers and Faxes - control printers
78. Printers Folder - printers
79. Regional Settings - intl.cpl
80. Registry Editor - regedit
81. Registry Editor - regedit32
82. Remote Access Phonebook - rasphone
83. Remote Desktop - mstsc
84. Removable Storage - ntmsmgr.msc
85. Removable Storage Operator Requests - ntmsoprq.msc
86. Resultant Set of Policy (for xp professional) - rsop.msc
87. Scanners and Cameras - sticpl.cpl
88. Scheduled Tasks - control schedtasks
89. Security Center - wscui.cpl
90. Services - services.msc
91. Shared Folders - fsmgmt.msc
92. Shuts Down Windows - shutdown
93. Sounds and Audio - mmsys.cpl
94. Spider Solitare Card Game - spider
95. SQL Client Configuration - cliconfg
96. System Configuration Editor - sysedit
97. System Configuration Utility - msconfig
98. System Information - msinfo32
99. System Properties - sysdm.cpl
100. Windows Explorer - explorer

How to Switch from Windows 10 S to Windows 10 Home, Pro, Enterprise, or Education

Windows 10 S Mode is designed for speed and security, only allowing you to install apps from the Microsoft Store. Windows 10 S is often found on cheaper laptops to cut costs and make a device more secure. In this tutorial, we look at how to switch to Windows 10 Home, Pro, Enterprise, or Education.

Note that switching is a one-way switch, meaning if you switch from S mode to Home, Pro, Enterprise, or Education, you can't go back to Windows 10 S later.

You should also back up anything important to you, including apps, photos, videos, and music.

Click Start > Settings Update & security > Activation.

Look for Switch to (your version of Windows). You can only switch to the version of Windows that was installed in S mode.

Click on Go to the Microsoft Store.

Click on Get under Switch out of S mode.

Click on Install when ready.

Click on Yes, let's go.

Windows will run everything in the background, and no reboot is required.

The Differences Between MBR and GPT


Master Boot Record (MBR)

MBR is the old standard for managing the partition in the hard disk, and it is still being used extensively by many people. The MBR resides at the very beginning of the hard disk and it holds the information on how the logical partitions are organized in the storage device. In addition, the MBR also contains executable code that can scan the partitions for the active OS and load up the boot up code/procedure for the OS.

For a MBR disk, you can only have four primary partitions. To create more partitions, you can set the fourth partition as the extended partition and you will be able to create more sub-partitions (or logical drives) within it. As MBR uses 32-bit to record the partition, each partition can only go up to a maximum of 2TB in size. This is how a typical MBR disk layout looks like:


There are several pitfalls with MBR. First of all, you can only have 4 partitions in the hard disk and each partition is limited to only 2TB in size. This is not going to work well with hard disk of big storage space, say 100TB. Secondly, the MBR is the only place that holds the partition information. If it ever get corrupted (and yes, it can get corrupted very easily), the entire hard disk is unreadable.

GUID Partition Table (GPT)

GPT is the latest standard for laying out the partitions of a hard disk. It makes use of globally unique identifiers (GUID) to define the partition and it is part of the UEFI standard. This means that on a UEFI-based system (which is required for Windows 8 Secure Boot feature), it is a must to use GPT. With GPT, you can create theoretically unlimited partitions on the hard disk, even though it is generally restricted to 128 partitions by most OSes. Unlike MBR that limits each partition to only 2TB in size, each partition in GPT can hold up to 2^64 blocks in length (as it is using 64-bit), which is equivalent to 9.44ZB for a 512-byte block (1 ZB is 1 billion terabytes). In Microsoft Windows, that size is limited to 256TB.


From the GPT Table Scheme diagram above, you can see that there is a primary GPT at the beginning of the hard disk and a secondary GPT at the end. This is what makes GPT more useful than MBR. GPT stores a backup header and partition table at the end of the disk so it can be recovered if the primary tables are corrupted. It also carry out CRC32 checksums to detect errors and corruption of the header and partition table.

You can also see that there is a protective MBR at the first sector of the hard disk. Such hybrid setup is to allow a BIOS-based system to boot from a GPT disk using a boot loader stored in the protective MBR’s code area. In addition, it protects the GPT disk from damage by GPT-unaware disk utilties.

OS Support

Intel Macs are using GPT by default and you won’t be able to install Mac OS X (without tweaks and hacks) on a MBR system. Mac OS X will run on MBR disk though, it is just that you won’t be able to install on it.

Most Linux kernels come with support for GPT. Unless you are compiling your own kernel and you didn’t add this feature in, you should have no problem getting your favorite distro to work in GPT disk. One thing to note, you wil have to use Grub 2 as the bootloader.

For Windows, only the 64-bit version of Windows from XP onward support booting from GPT disk. If you are getting a laptop pre-installed with 64-bit Windows 8, most probably it is using GPT. For Windows 7 and earlier version, the default configuration will be MBR instead of GPT.

Conclusion

In most cases, you will be fine with either MBR or GPT. It is only in situation where you need to install Windows on a Mac, or when you need to have a partition bigger than 2TB, that you need to use GPT, or convert MBR to GPT. Also, for the newer model of computer that uses UEFI, it will only support GPT.​