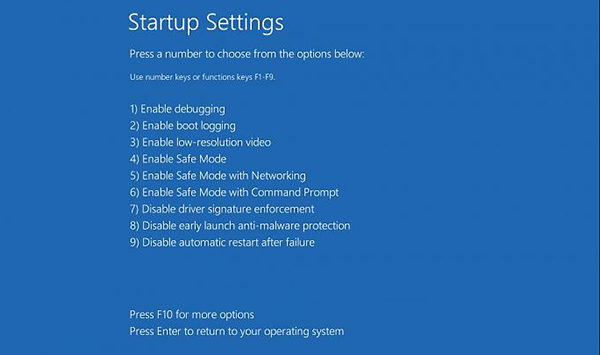
Advanced Startup Settings lets you start Windows 10 in different advanced troubleshooting modes to help you find and fix problems on your PC.
Normally, you could boot to Advanced Startup Options
to select to restart to Startup Settings.
If you like, you could set Windows 10 to always boot to Startup Settings first
then either press a number or function key (F1 thru F9)
to choose a boot option, or press Enter to continue booting to Windows 10.
This Tip will show you how to enable or disable
to always boot to Startup Settings on your Windows 10 PC.
NOTE: You must be signed in as an Administrator to be able to enable or disable to always boot to Startup Settings.
STARTUP SETTINGS / DESCRIPTION
Below is an explanation of what each individual selection
in the Startup Settings screen will be available for you to choose.
1) Enable debugging>>>Starts Windows in an advanced troubleshooting mode
intended for IT pros and system admins.
2) Enable boot logging>>>Creates a file, ntbtlog.txt, that lists all the drivers
that are installed during startup and that might be useful
for advanced troubleshooting.
3) Enable low-resolution video>>>Starts Windows using your current video driver
and using low resolution and refresh rate settings.
(You can use this mode to reset your display settings.)
4) Enable Safe Mode>>>Starts Windows with a minimal set of drivers and services.
5) Enable Safe Mode with Networking>>>Starts Windows in safe mode
and includes the network drivers and services needed to access the Internet
or other computers on your network.
6) Enable Safe Mode with Command Prompt>>>Starts Windows in safe mode
with a Command Prompt window instead of the usual Windows interface.
This option is intended for IT pros and system admins.
7) Disable driver signature enforcement>>>Allows drivers containing improper
(aka: unsigned) signatures to be installed.
8) Disable early launch anti-malware protection>>>Prevents the early launch
anti-malware driver from starting,
allowing drivers that might contain malware to be installed.
9) Disable automatic restart after failure>>>Prevents Windows from automatically restarting if an error causes Windows to fail.
Choose this option only if Windows is stuck in a loop where Windows fails, tries to restart,
and fails again repeatedly.
Here is a Picture of Startup Settings Screen in Windows 10

WARNING BEFORE PROCEEDING:
If after enabling, you let Startup Settings screen sit idle for 1 minute at boot, your PC will be automatically turned off.
Here's How To Enable / Disable Startup Settings Screen
1. Open an Elevated Command Prompt** (see instructions below) in Windows 10
Simple Option On How To Open Elevated Command Prompt using Taskbar Search
a) Using Taskbar Search, type cmd in search box
b) When Command Prompt shows up in results, right click with your mouse, then click/tap on Run as Administrator


(I know, there are many more ways to do this, but I just wanted to show off my desktop wallpaper)
2. Do step 3 (enable) or step 4 (disable) below for what you want.
3. To Enable Always Boot to Startup Settings
a) Type the command below in the command prompt, and press Enter. (recommend you copy it then paste it to prevent errors)
bcdedit /set {globalsettings} advancedoptions true

b) After entering command, exit screen and reboot your PC. This will then bring you to the Startup Settings screen.
NOTE: With the Startup Settings screen being enabled, you may experience a slower boot time while the Startup Settings screen is loaded. This is normal.
4. To Disable Always Boot to Startup Settings
NOTE: This is the initial default setting
a) Type the command below in the command prompt, and press Enter. (recommend you copy it then paste it to prevent errors)
bcdedit /set {globalsettings} advancedoptions false

b) After entering command, exit screen and reboot your PC.
All Finished.
I use this setting with the PC's in my home for its convenience when I'm troubleshooting any of my family's computer systems.

No comments:
Post a Comment